> ## Documentation Index
> Fetch the complete documentation index at: https://docs.ycloud.com/llms.txt
> Use this file to discover all available pages before exploring further.
# Chat Links
Generate shareable links, QR codes, or chat widgets for numbers.
Open **WhatsApp Manager**, select your business number, and open **Chat Links** in its settings.
## Key Points
**Simplified Communication Process**\
Typically, to chat via WhatsApp app, you need to know the other party's phone number, save it on your mobile device, and then search for it to start a conversation. With YCloud's growth tools, this process is simplified, as customers can initiate a WhatsApp chat just by clicking a link or scanning a QR code.
**Quick Replies**\
With simple setup, you can preset custom messages and automatically reply quickly, supporting a large number of customers accessing simultaneously. To enable this feature, you need to connect your WhatsApp account in YCloud.
**Multiple Ways to Reach Users**\
You can generate QR codes, links, or chat widgets for various scenarios such as websites, apps, landing pages, and offline stores. This allows you to capture potential customer.
**Compliance in Collecting User Information**\
Customers who chat with you through YCloud Chat Links are automatically added to your Contacts. You can view and edit their information, such as the time added and the last conversation time, and use YCloud mass messaging tool to create suitable marketing campaigns for targeted customers.
## Usage Scenarios
**Website Customer Service Entry:** Insert a chat widget on your website to allow customers to quickly find the WhatsApp customer service entry.
**Distributing Flyers:** Print QR codes on flyers and distribute them. Interested customers can scan the code to quickly obtain leads.
**Scan to Join Membership:** Place a membership QR code in your offline store. Customers can join your membership system via WhatsApp and successfully leave their membership details.
**Landing Page Inquiry:** Add a WhatsApp button on the landing page. Interested customers can click the button to connect with you via WhatsApp, without worrying about incorrect contact information, directly obtaining the target customer's WhatsApp account.
## Generation of Links and QR Codes
The generation method for links and QR codes is the same, with the following example using a QR code tutorial.
### Step 1: Click the Create Button
 ### Step 2: Select Type QR Code
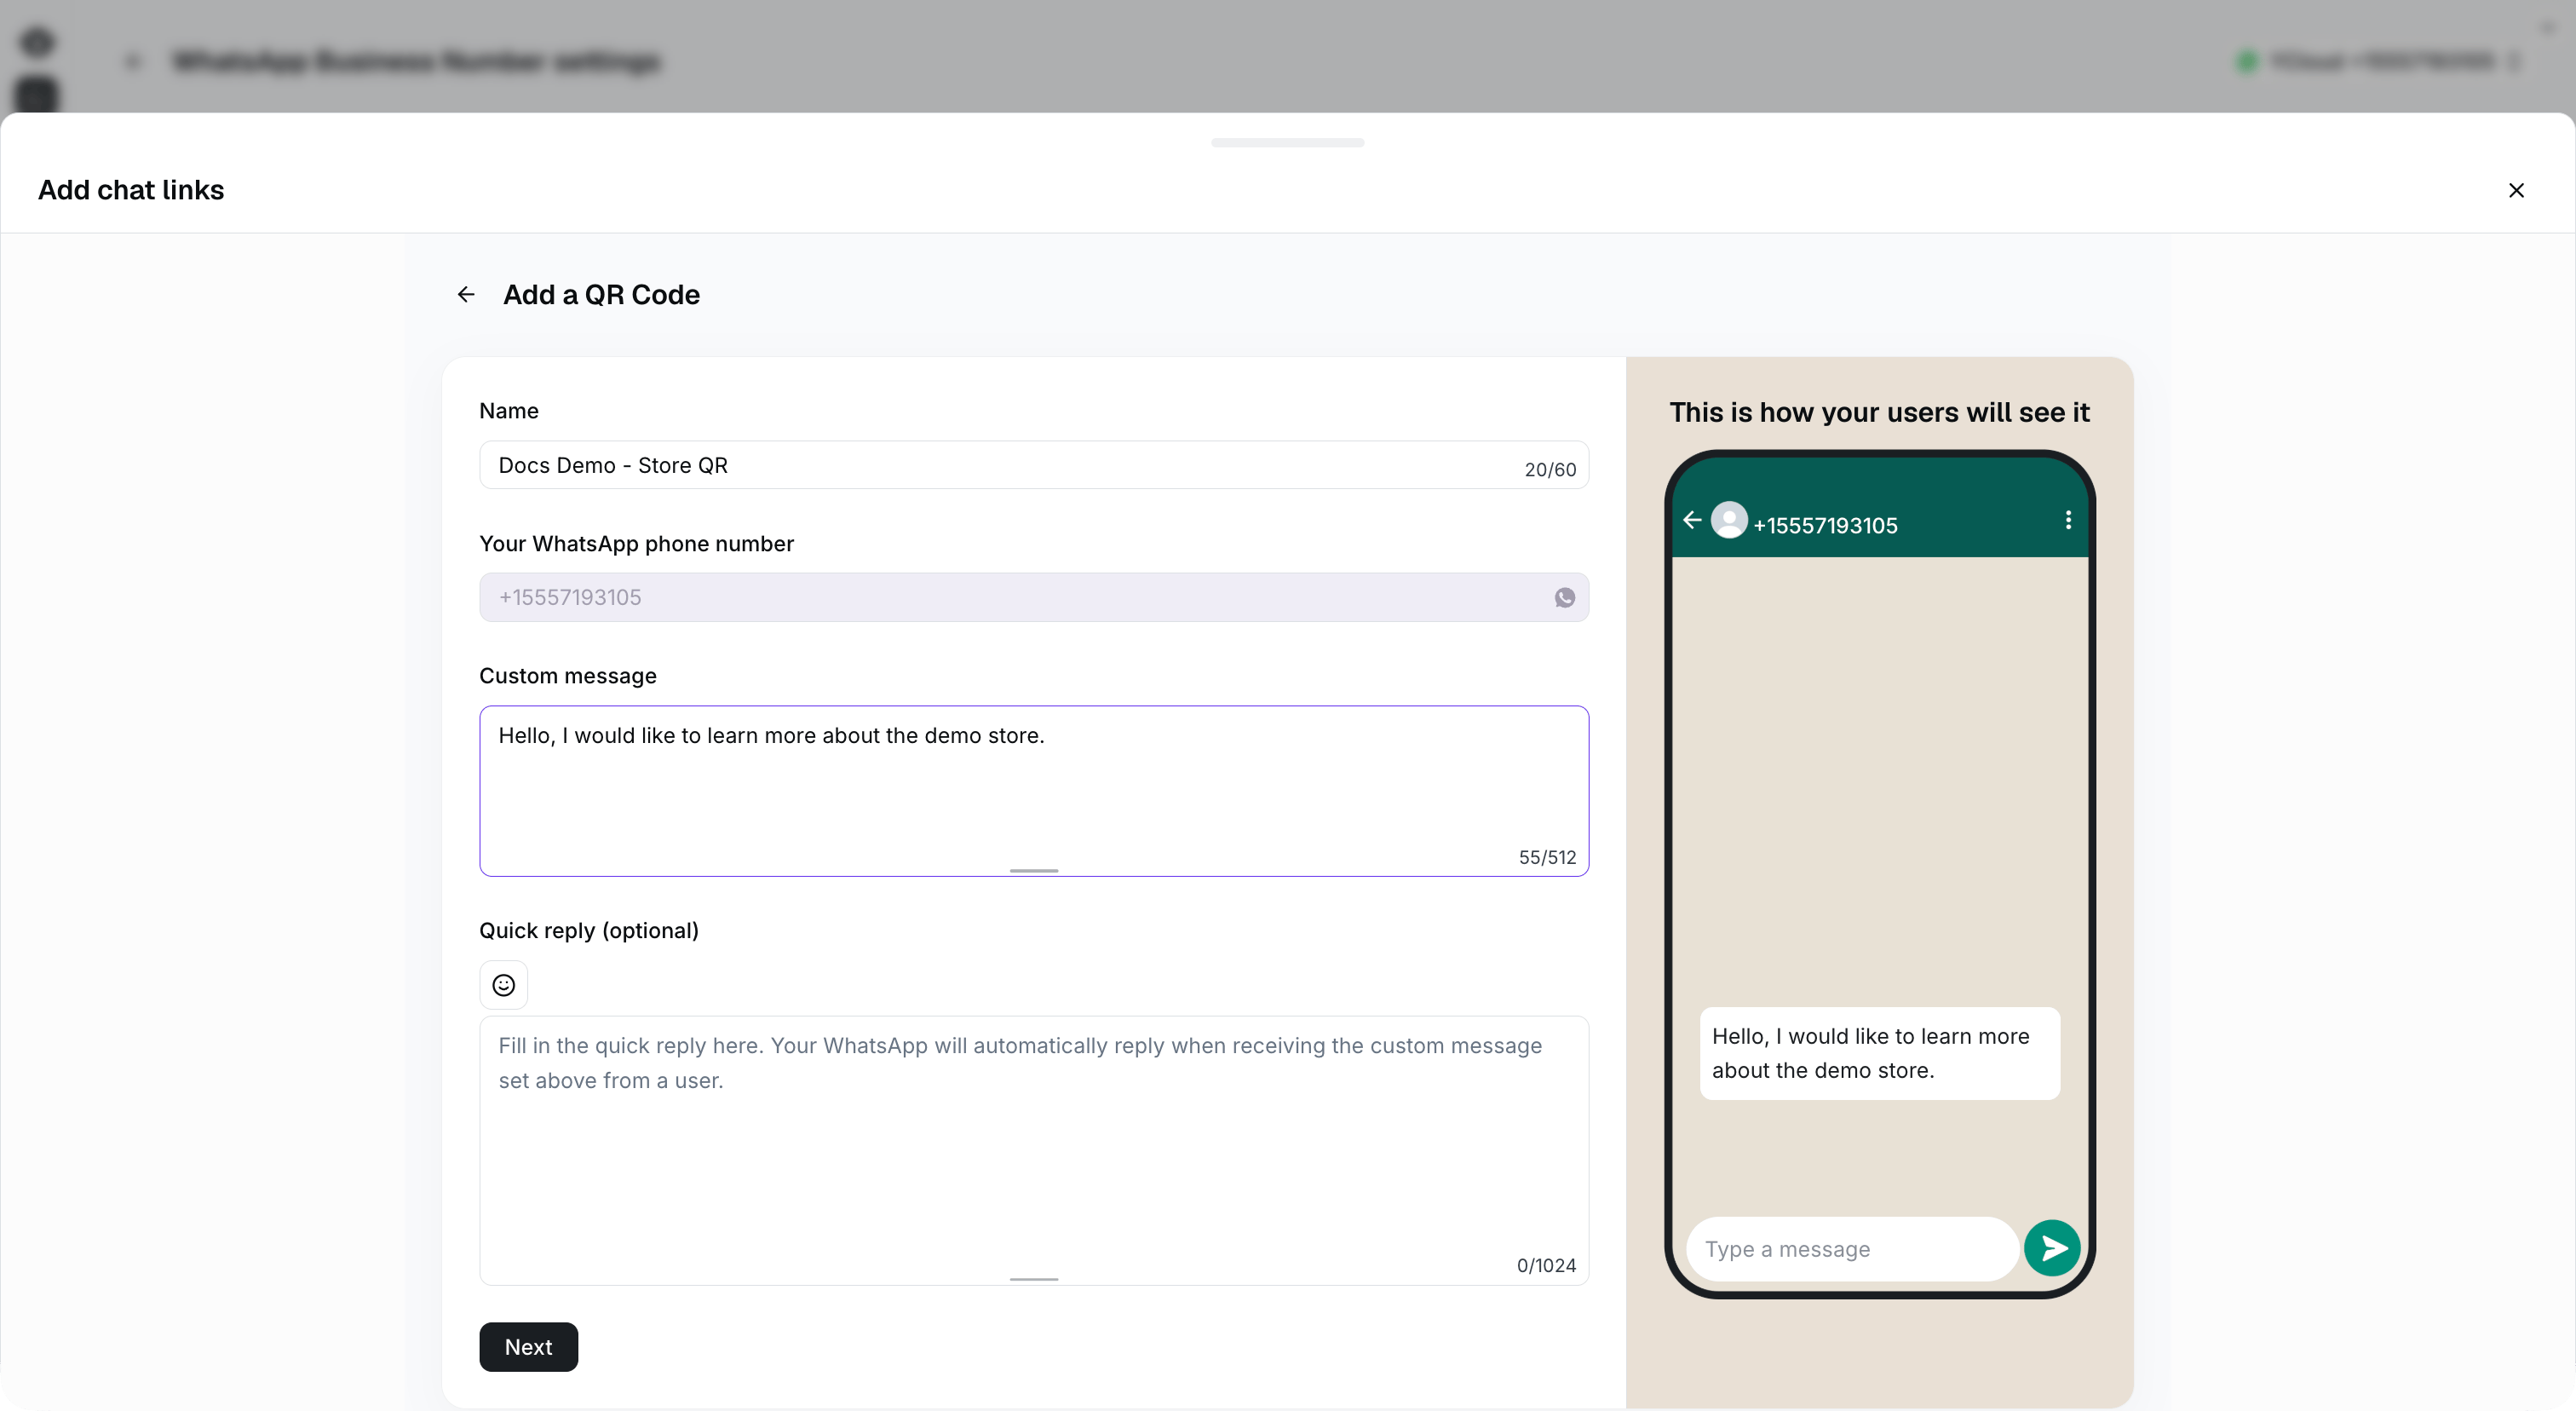
 ### Step 3: Set Link Content
Link Name: For internal display only
Preset Content: When a user clicks the link or scans the QR code, this text will automatically populate the chat input box.
Quick Reply (Optional): You can configure an automatic reply message based on the content.
Click Next after setting up.
### Step 3: Set Link Content
Link Name: For internal display only
Preset Content: When a user clicks the link or scans the QR code, this text will automatically populate the chat input box.
Quick Reply (Optional): You can configure an automatic reply message based on the content.
Click Next after setting up.
 ### Step 4: Copy Link and QR Code
Successfully generated, download the QR code or link.
### Step 4: Copy Link and QR Code
Successfully generated, download the QR code or link.
 ## Chat Widget Generation
### Step 1: Click the Create Button
## Chat Widget Generation
### Step 1: Click the Create Button
 ### Step 2: Select Chat Widget
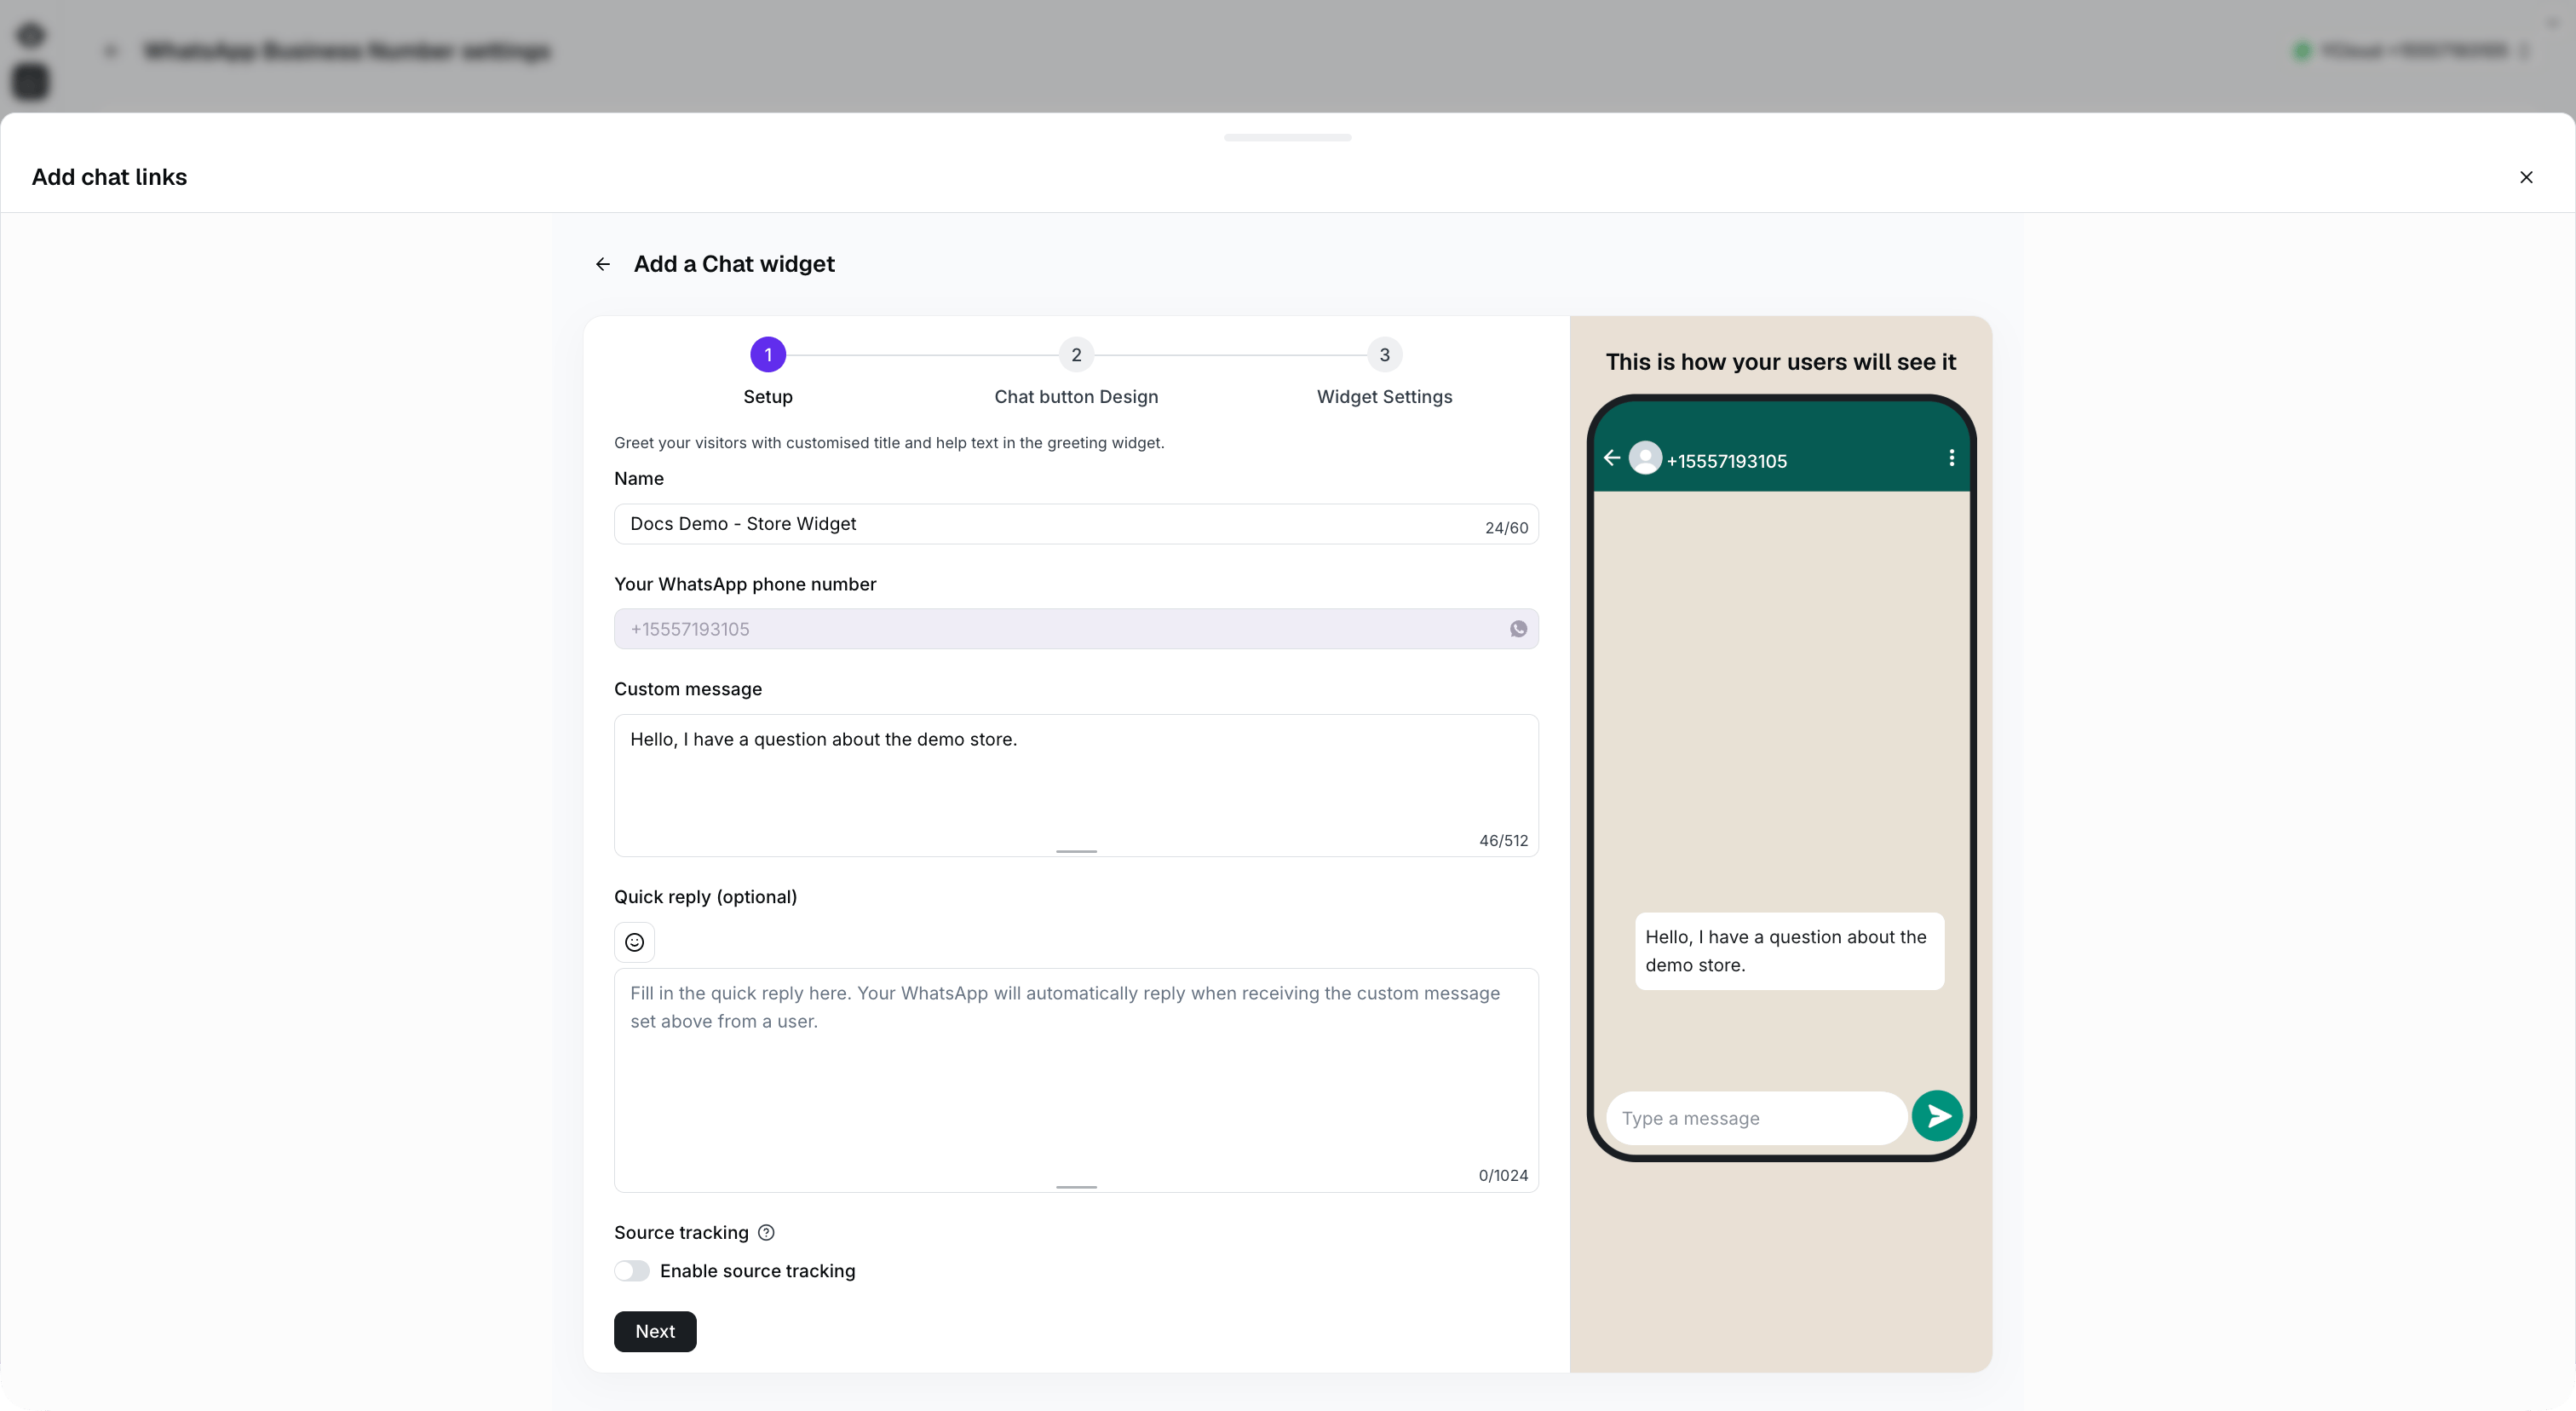
 ### Step 3: Configure the chat content and source tracking
Complete the following fields:
* **Name:** An internal name used to identify this chat widget in YCloud.
* **Your WhatsApp phone number:** The business phone number that receives conversations started from the widget.
* **Custom message:** A preset message that customers can send when they open WhatsApp.
* **Quick reply (optional):** An automatic reply triggered when YCloud receives the configured customer message.
* **Source tracking:** Enable this option to record the URL of the page from which the customer opened the chat widget.
When source tracking is enabled, the page URL is recorded with the incoming conversation. This helps your team understand which page led the customer to contact your business.
**E-commerce use case:** If the same chat widget is installed across multiple product pages, source tracking lets an agent identify the product page the customer was viewing. The agent can then understand which product the customer is asking about before responding.
Source tracking records the page URL at the moment the customer opens the widget. It does not record the customer's browsing history.
Click **Next** after completing the configuration.
### Step 3: Configure the chat content and source tracking
Complete the following fields:
* **Name:** An internal name used to identify this chat widget in YCloud.
* **Your WhatsApp phone number:** The business phone number that receives conversations started from the widget.
* **Custom message:** A preset message that customers can send when they open WhatsApp.
* **Quick reply (optional):** An automatic reply triggered when YCloud receives the configured customer message.
* **Source tracking:** Enable this option to record the URL of the page from which the customer opened the chat widget.
When source tracking is enabled, the page URL is recorded with the incoming conversation. This helps your team understand which page led the customer to contact your business.
**E-commerce use case:** If the same chat widget is installed across multiple product pages, source tracking lets an agent identify the product page the customer was viewing. The agent can then understand which product the customer is asking about before responding.
Source tracking records the page URL at the moment the customer opens the widget. It does not record the customer's browsing history.
Click **Next** after completing the configuration.
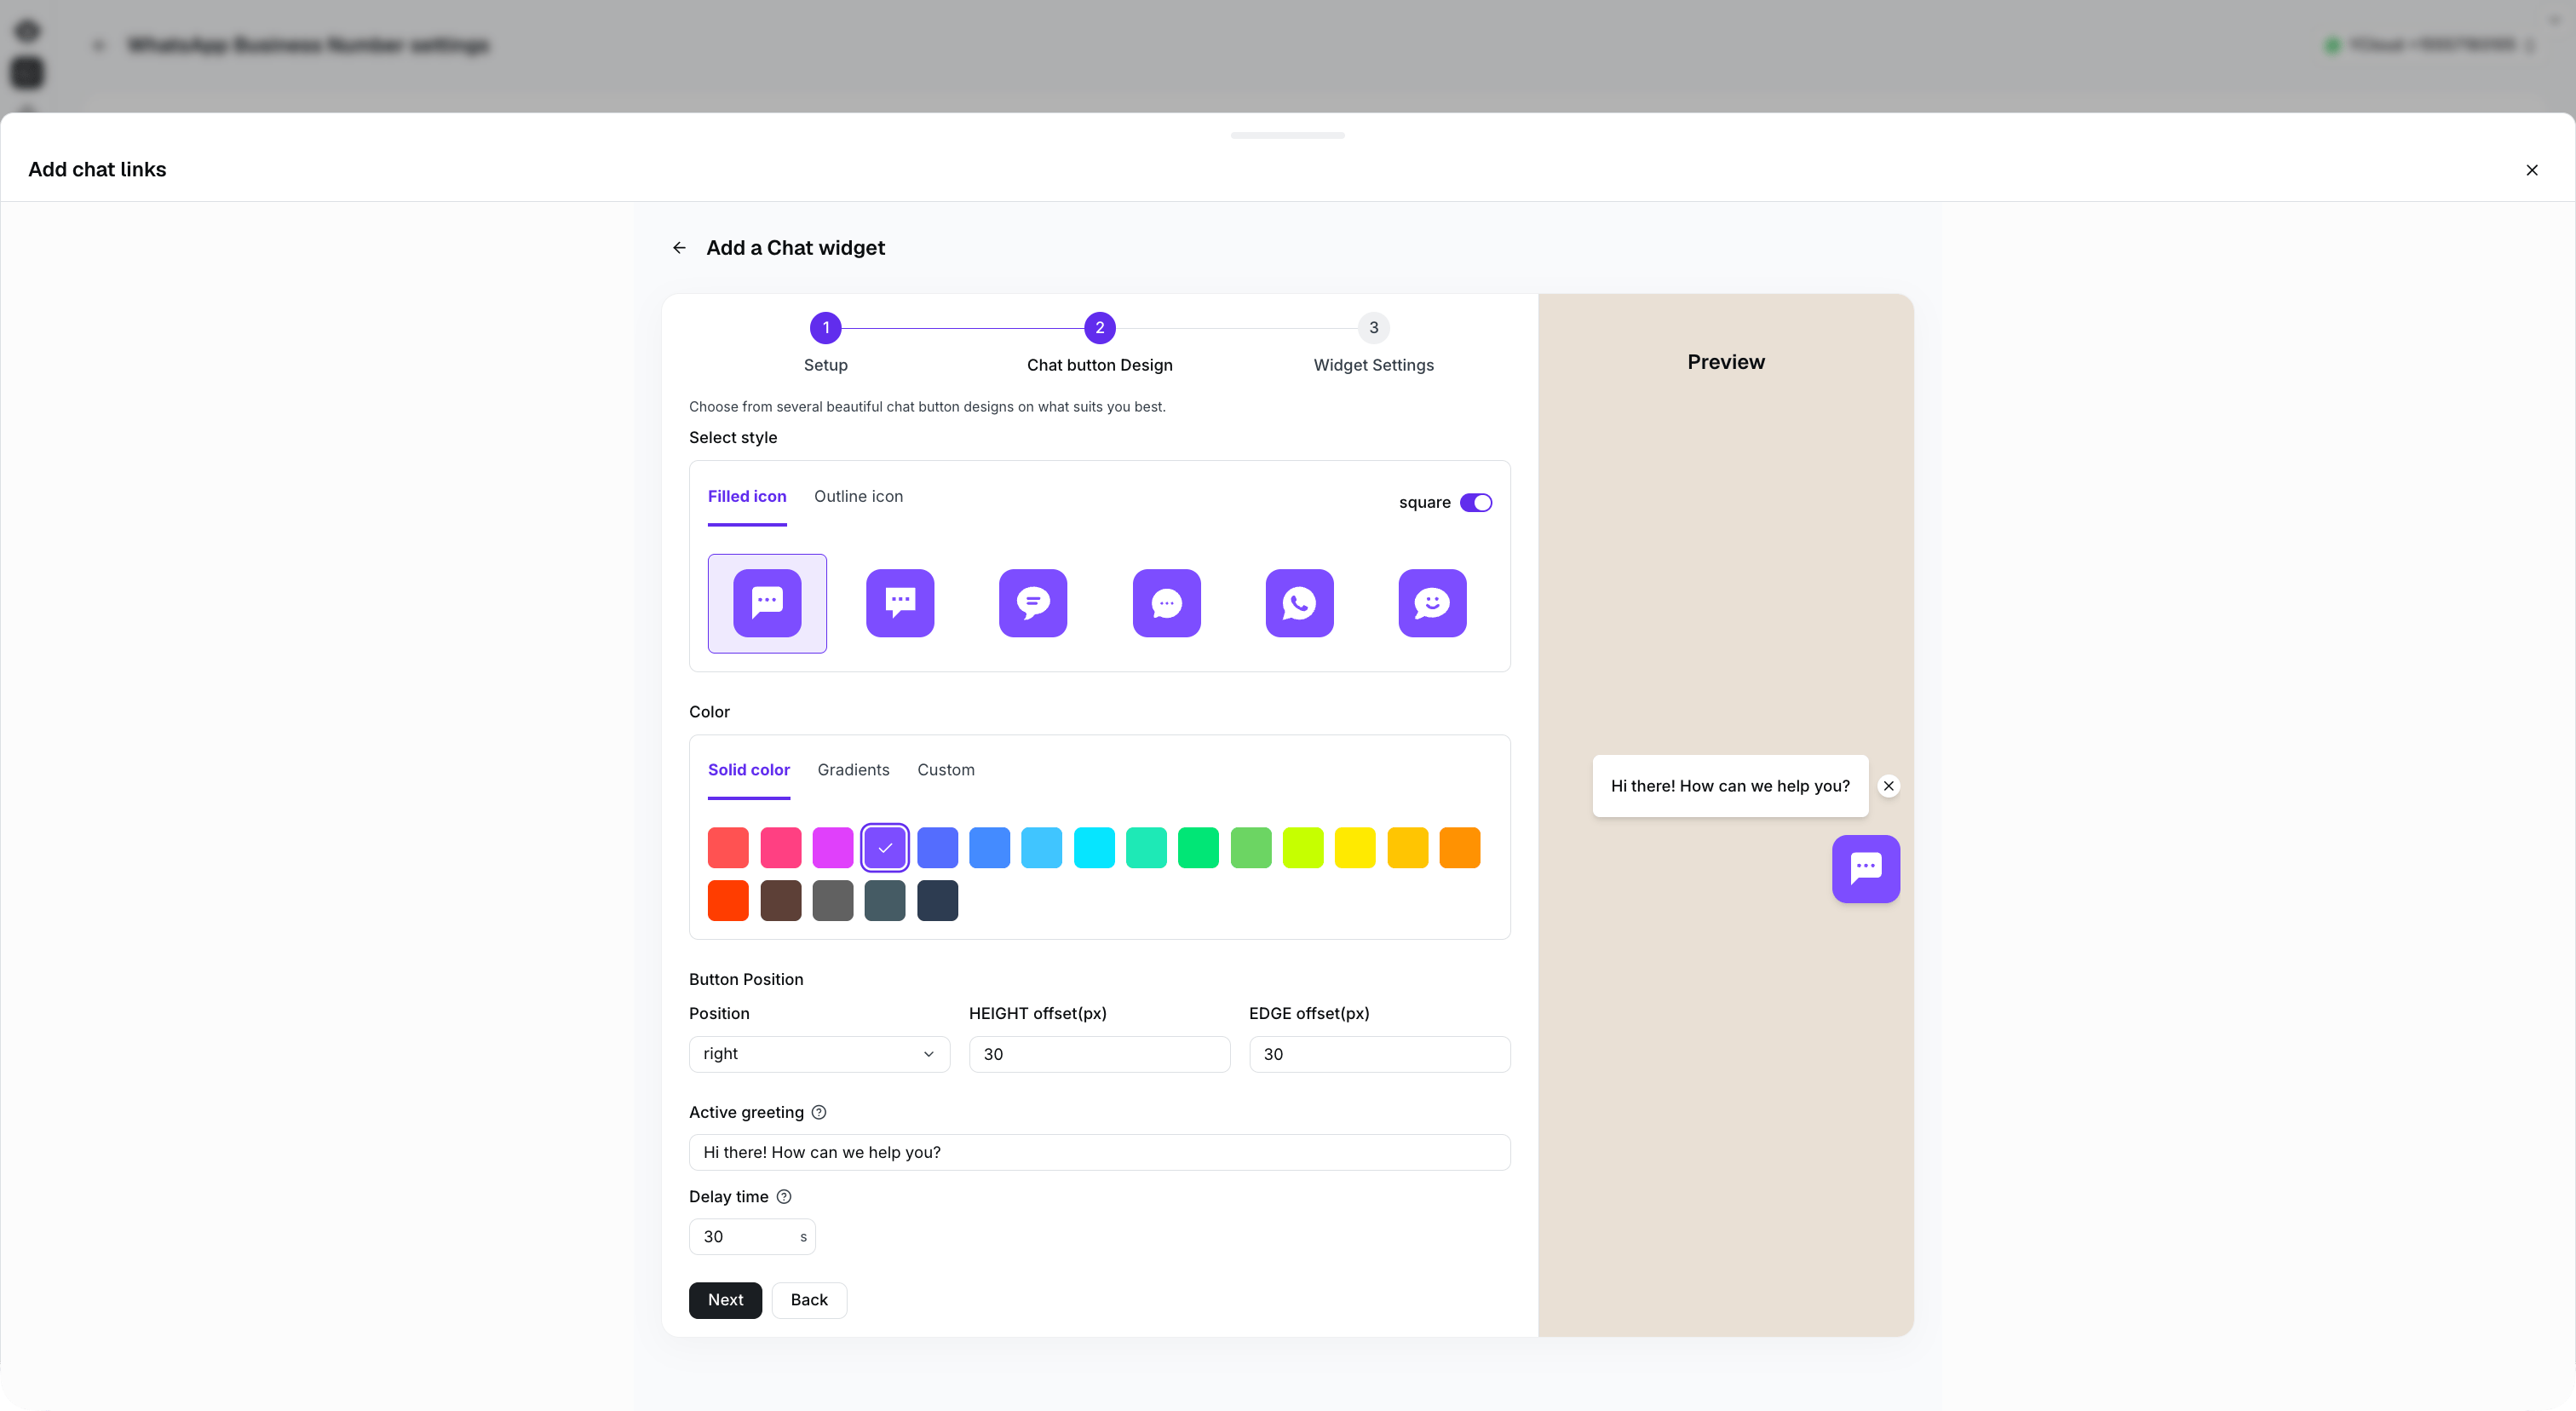
 ### Step 4: Configure Icon Style
* Icon Style: Circle or square, the shape of the icon.
* Color: Icon color selection, supports solid, gradient, and custom colors.
* Widget Position: The position on the computer screen.
* Greeting Message: The automatic pop-up greeting message.
* Delay Display Time: How long after the customer enters the page the greeting message appears.
### Step 4: Configure Icon Style
* Icon Style: Circle or square, the shape of the icon.
* Color: Icon color selection, supports solid, gradient, and custom colors.
* Widget Position: The position on the computer screen.
* Greeting Message: The automatic pop-up greeting message.
* Delay Display Time: How long after the customer enters the page the greeting message appears.
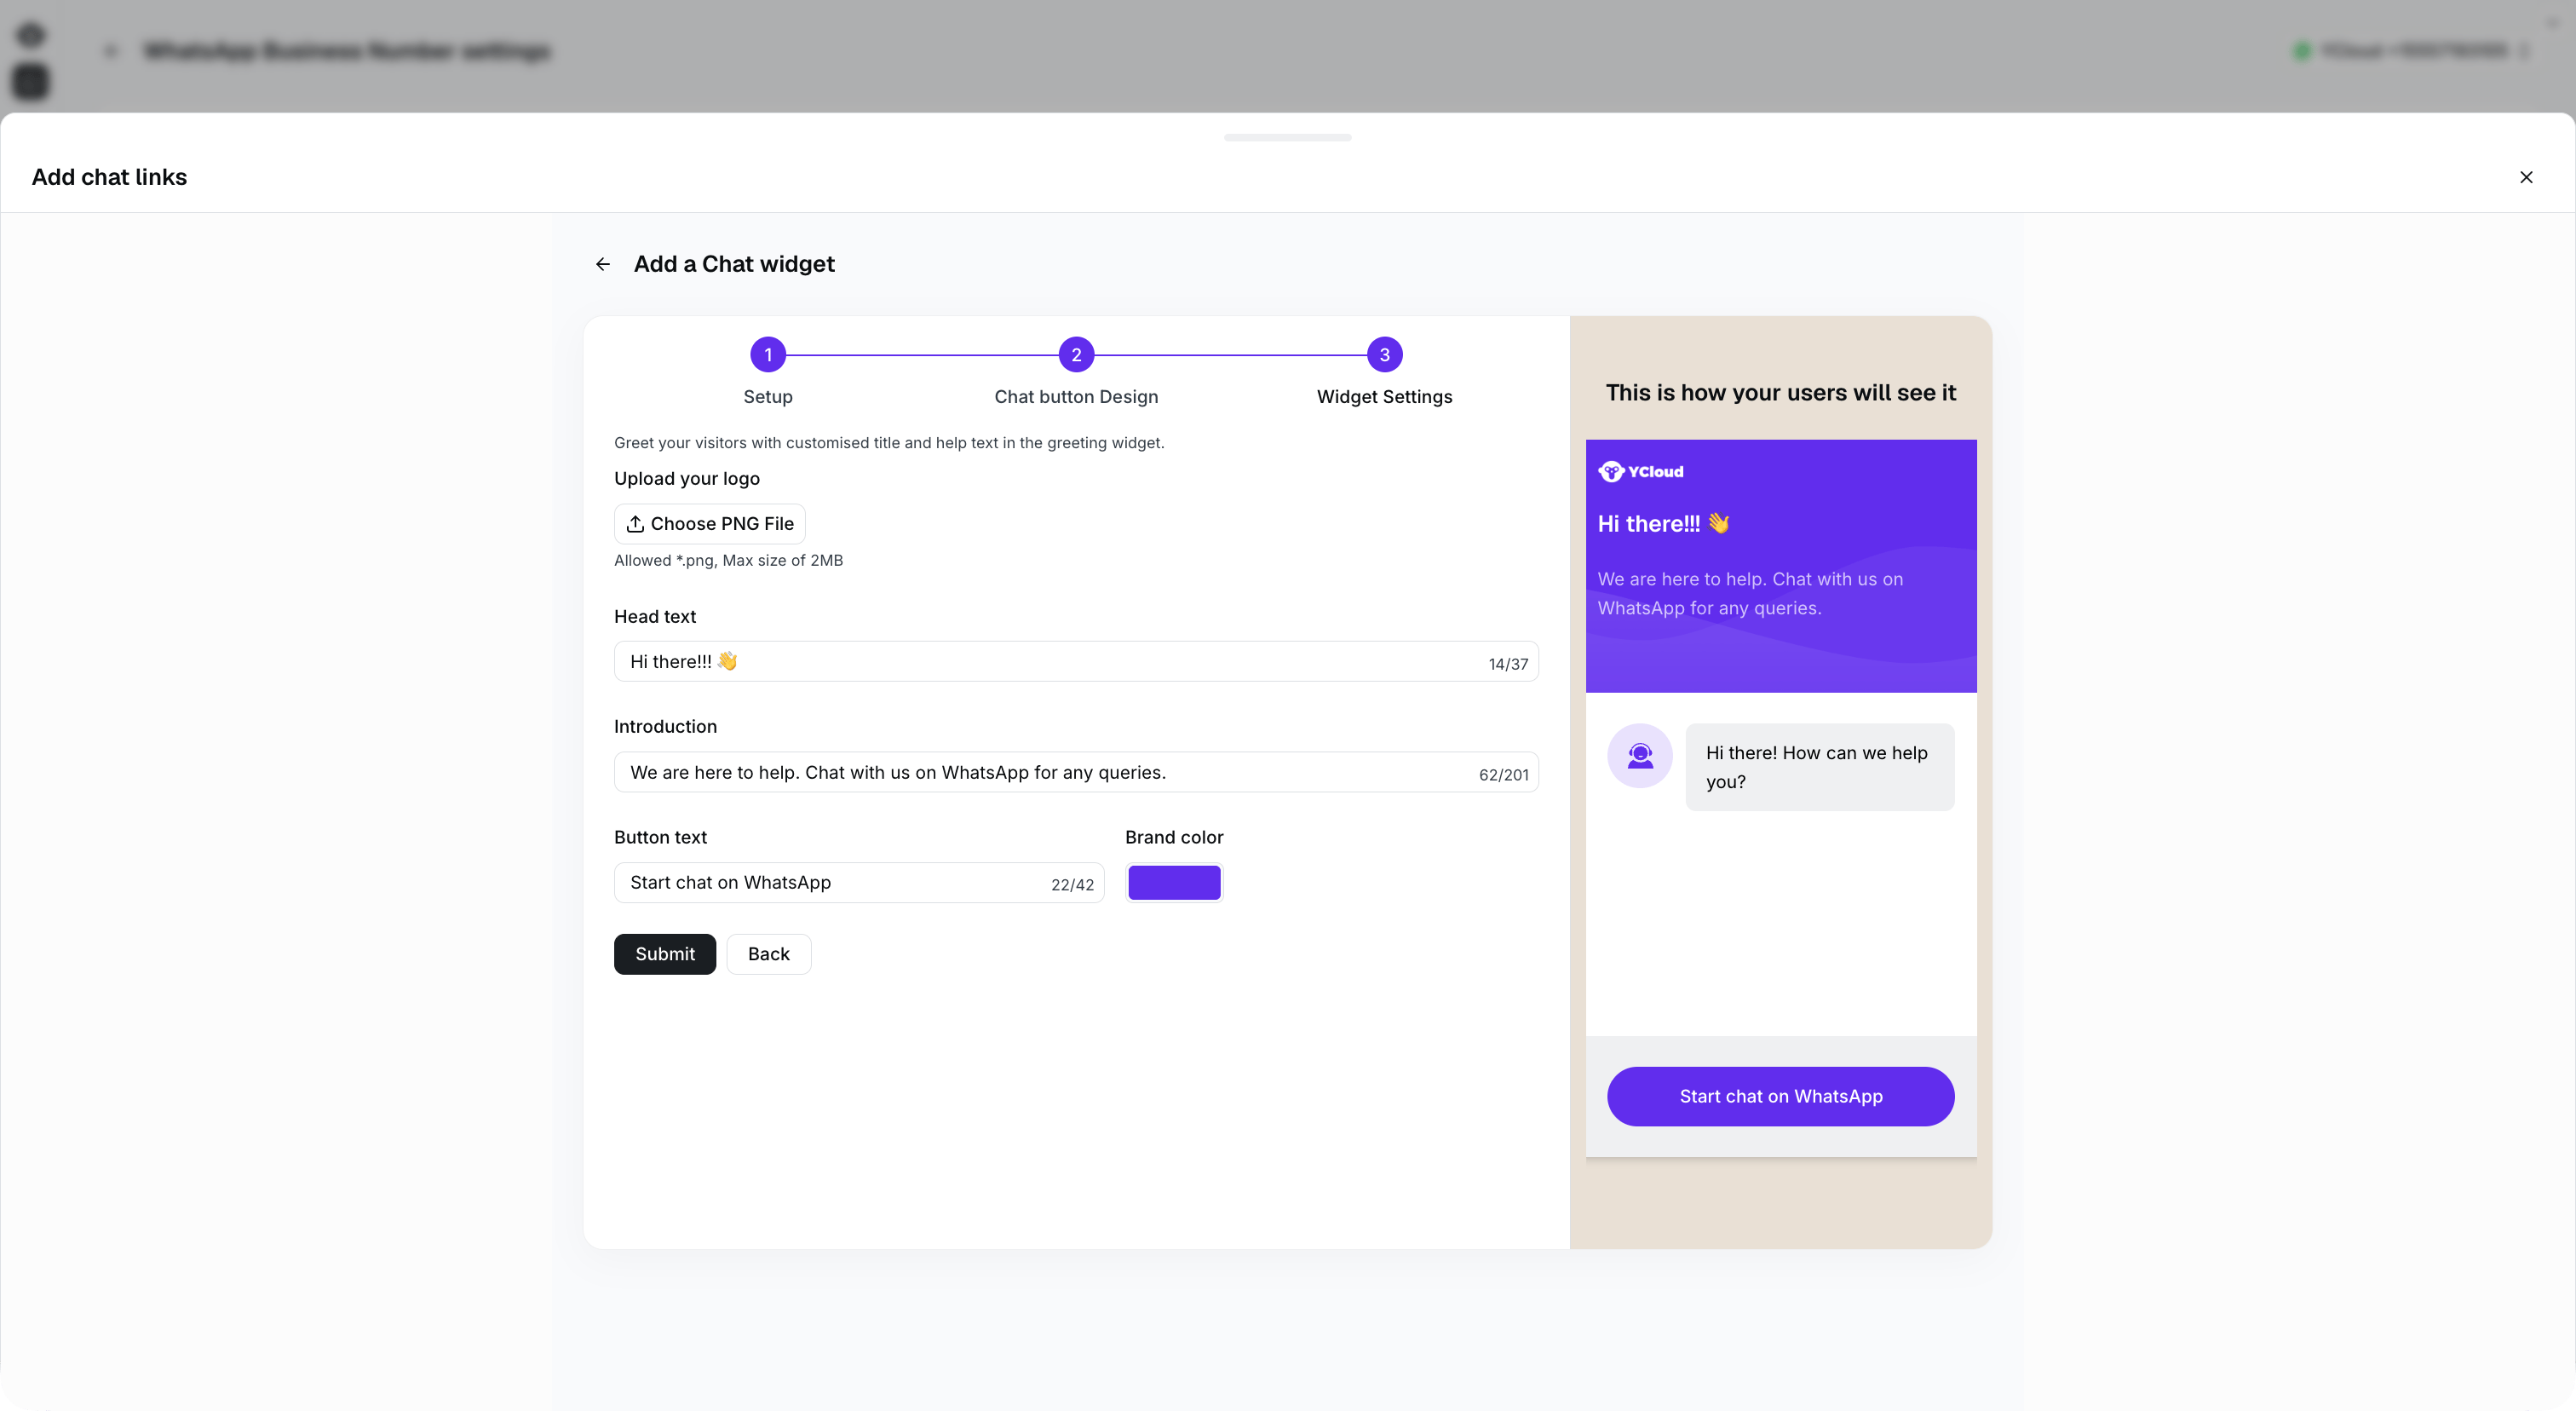
 ### Step 5: Configure Widget Information
* Company Logo
* Welcome Message Setup
* Theme Color Configuration
* Button Text Configuration
### Step 5: Configure Widget Information
* Company Logo
* Welcome Message Setup
* Theme Color Configuration
* Button Text Configuration
 ### Step 6: Copy Code and Install
Creation successful, copy the generated code and install it on your website.
### Step 6: Copy Code and Install
Creation successful, copy the generated code and install it on your website.
 ## Frequently asked questions
Yes. However, modifying the configuration regenerates the link or widget code. Save the changes and replace the existing link or code with the newly generated version.
This documentation is built and hosted on [Mintlify](https://mintlify.com), a developer documentation platform.
## Frequently asked questions
Yes. However, modifying the configuration regenerates the link or widget code. Save the changes and replace the existing link or code with the newly generated version.
This documentation is built and hosted on [Mintlify](https://mintlify.com), a developer documentation platform.