> ## Documentation Index
> Fetch the complete documentation index at: https://docs.ycloud.com/llms.txt
> Use this file to discover all available pages before exploring further.
# Admin Guide
> Configure team access, assignment rules, automation, tags, canned responses, and reporting for Inbox.
## Add Team Members
### Step 1: Invite team members
1. Click the **Settings** gear in the lower-left navigation, go to **Users and teams > Users**, then click **Invite user**.
 1. Fill in the basic information of the member to be invited, then click the "Add" button. The system will send an activation email to the member's email address.
 ### Step 2: Team member accepts the invitation
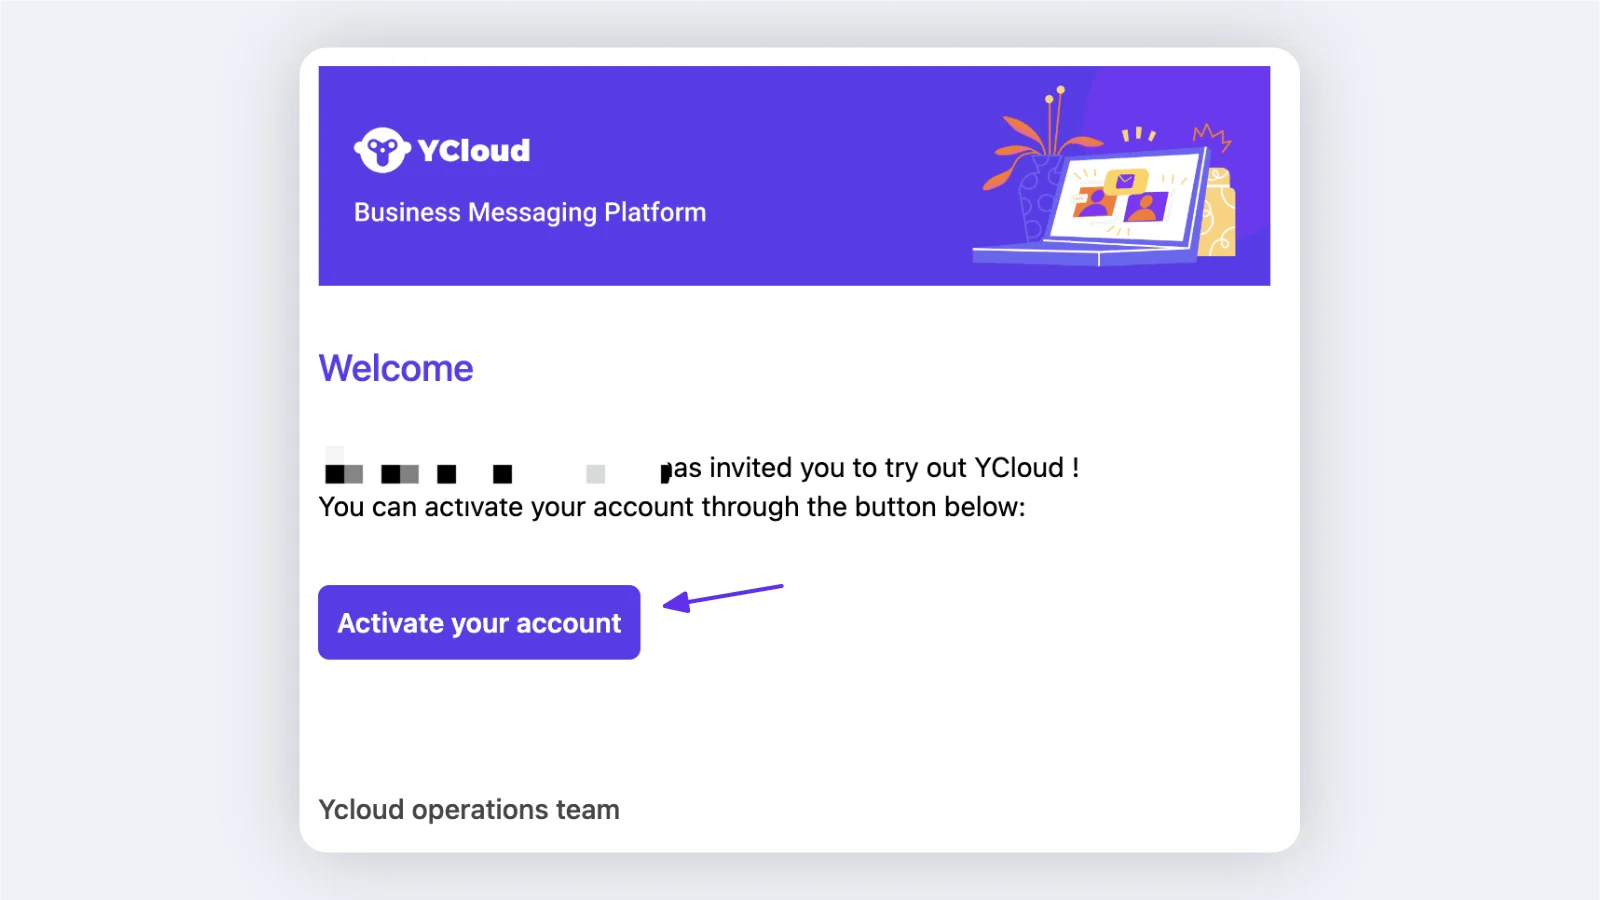
The member finds the corresponding activation email and clicks the "Activate account" button to accept the invitation and complete account activation.
> **Tip**
### Step 2: Team member accepts the invitation
The member finds the corresponding activation email and clicks the "Activate account" button to accept the invitation and complete account activation.
> **Tip**
 **Tip**
Please note that invited users do not need to register a new account through the YCloud official website.
> **Note**
After completing the steps above, team members can log in to the YCloud console and view messages in Inbox. If you want the system to automatically assign conversations to them, add the user under the corresponding WhatsApp number's Settings > Assignment rules.
### Step 3: Add service agents to the team
Set up customer service agents and add them to the team to make future assignment and handoff easier.
For details, see [Create a team](/en/documentation/account-management/users-and-teams)
## Inbox settings
### Authorize starting new conversations
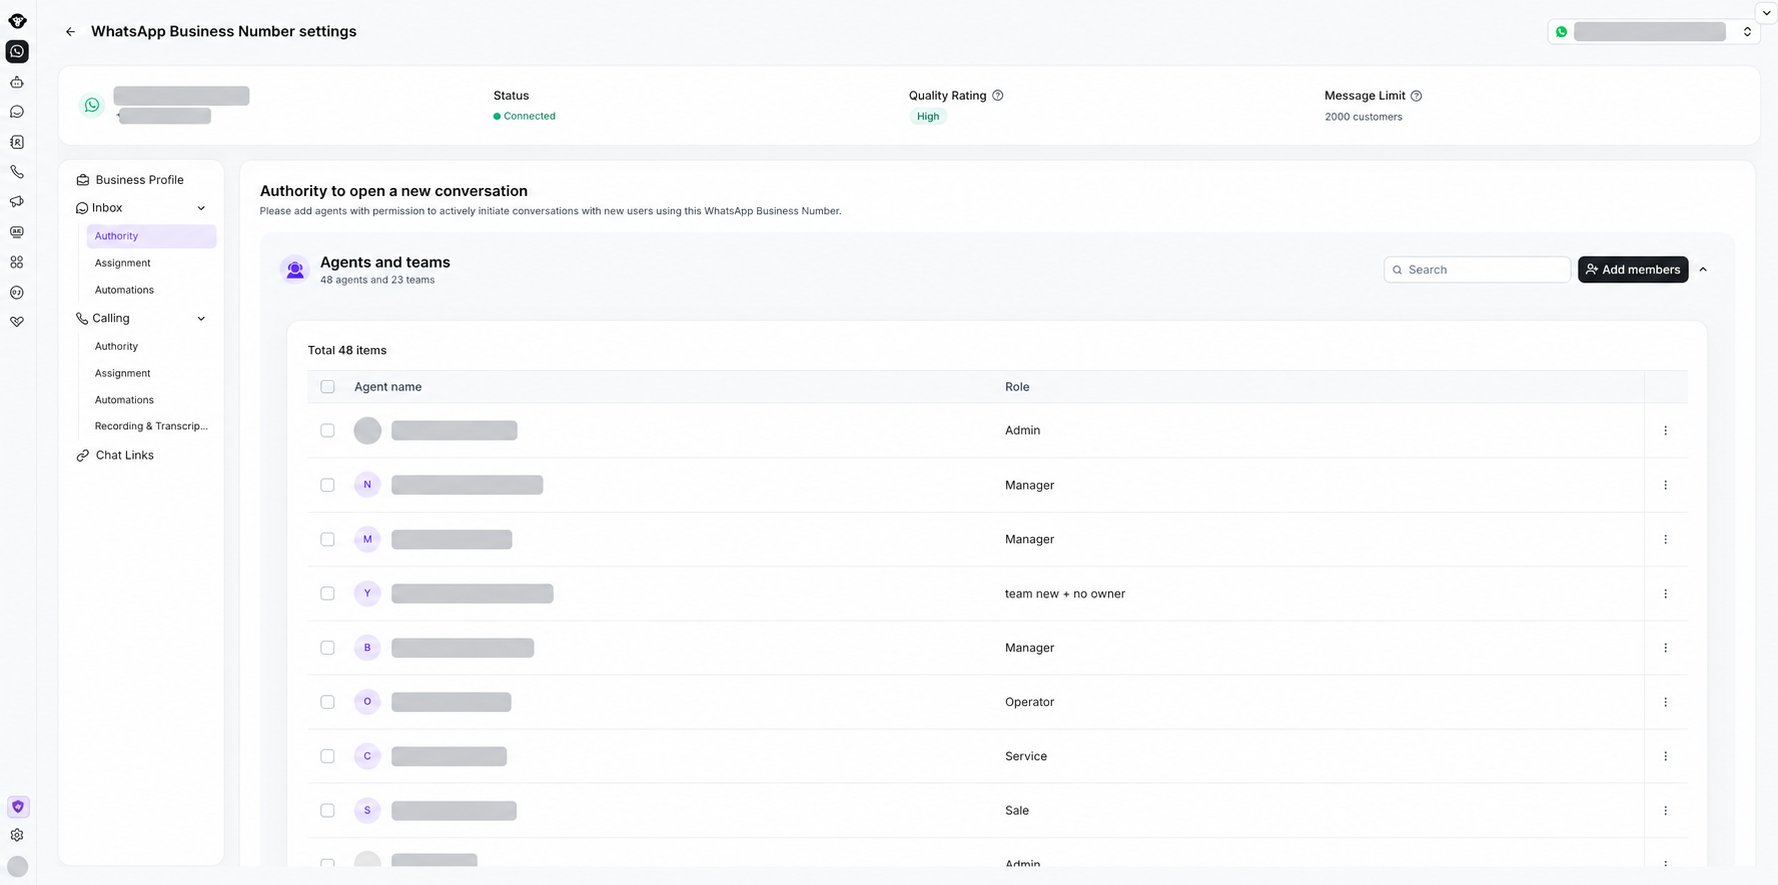
To make number permission management easier, Inbox includes an Authority submenu. This feature controls a user's permission to start new conversations using that number.
#### **Instructions**
1. Click the \[Add member] button, then search for and add the member or team you want to include.
2. For added members or teams, use the \[Remove] button on the right side of the list to remove a single item, or select items with the checkboxes on the left and delete them in batches.
3. Use the search box in the upper-right corner to search members by user name or email address.
4. For members newly invited through \[Users and teams] in Settings, the system will automatically grant them permission to start new conversations for all numbers under the tenant. If you do not want certain users to have this permission for specific numbers, you can remove it here.
#### **Use cases**
Here are some example use cases:
1. If you do not want sales staff to have permission to proactively start conversations for certain numbers, you can remove sales staff from the authorization list.
2. Numbers representing different product lines may be handled by different employees, and they only have permission to start new conversations for the numbers assigned to them.
**Tip**
Please note that invited users do not need to register a new account through the YCloud official website.
> **Note**
After completing the steps above, team members can log in to the YCloud console and view messages in Inbox. If you want the system to automatically assign conversations to them, add the user under the corresponding WhatsApp number's Settings > Assignment rules.
### Step 3: Add service agents to the team
Set up customer service agents and add them to the team to make future assignment and handoff easier.
For details, see [Create a team](/en/documentation/account-management/users-and-teams)
## Inbox settings
### Authorize starting new conversations
To make number permission management easier, Inbox includes an Authority submenu. This feature controls a user's permission to start new conversations using that number.
#### **Instructions**
1. Click the \[Add member] button, then search for and add the member or team you want to include.
2. For added members or teams, use the \[Remove] button on the right side of the list to remove a single item, or select items with the checkboxes on the left and delete them in batches.
3. Use the search box in the upper-right corner to search members by user name or email address.
4. For members newly invited through \[Users and teams] in Settings, the system will automatically grant them permission to start new conversations for all numbers under the tenant. If you do not want certain users to have this permission for specific numbers, you can remove it here.
#### **Use cases**
Here are some example use cases:
1. If you do not want sales staff to have permission to proactively start conversations for certain numbers, you can remove sales staff from the authorization list.
2. Numbers representing different product lines may be handled by different employees, and they only have permission to start new conversations for the numbers assigned to them.
 ### Basic assignment rule configuration
You can set basic rules for automatically assigning new conversations, divided into priority rules and secondary rules:
Priority rules can be set to last-agent assignment, which prioritizes the agent who last served the customer (when that agent is online); or customer ownership assignment, which prioritizes the designated agent responsible for the customer's account.
Secondary rules can be set to no assignment, sequential assignment, or load balancing assignment.
You can freely combine these rules to meet different customer service needs and improve efficiency.
#### **Step 1: Go to the settings page of the target number.**
Open **WhatsApp accounts**, select the business number, then go to **Inbox > Assignment** in its settings.
### Basic assignment rule configuration
You can set basic rules for automatically assigning new conversations, divided into priority rules and secondary rules:
Priority rules can be set to last-agent assignment, which prioritizes the agent who last served the customer (when that agent is online); or customer ownership assignment, which prioritizes the designated agent responsible for the customer's account.
Secondary rules can be set to no assignment, sequential assignment, or load balancing assignment.
You can freely combine these rules to meet different customer service needs and improve efficiency.
#### **Step 1: Go to the settings page of the target number.**
Open **WhatsApp accounts**, select the business number, then go to **Inbox > Assignment** in its settings.
 #### **Step 2: Set the priority assignment rules**
**Priority assignment rules > secondary assignment rules.** When the priority assignment rule switch is enabled, priority rules are executed first. Secondary rules are only executed when the priority rules cannot be satisfied.
When both are enabled, the **priority of priority rule options is from top to bottom**
* Priority 1: When a conversation comes in, the system checks whether the customer has an Owner. If so, the conversation is forcibly assigned to that Owner.
* Priority 2: The conversation is assigned to the agent who last handled the conversation.
* You can choose only when the last handling agent is online
* Or assign regardless of online status
* Priority 3: Assign the conversation to a specific agent, a specific agent team, a specific AI Agent, or unassigned.
#### **Step 2: Set the priority assignment rules**
**Priority assignment rules > secondary assignment rules.** When the priority assignment rule switch is enabled, priority rules are executed first. Secondary rules are only executed when the priority rules cannot be satisfied.
When both are enabled, the **priority of priority rule options is from top to bottom**
* Priority 1: When a conversation comes in, the system checks whether the customer has an Owner. If so, the conversation is forcibly assigned to that Owner.
* Priority 2: The conversation is assigned to the agent who last handled the conversation.
* You can choose only when the last handling agent is online
* Or assign regardless of online status
* Priority 3: Assign the conversation to a specific agent, a specific agent team, a specific AI Agent, or unassigned.
 ### **Advanced assignment rule configuration**
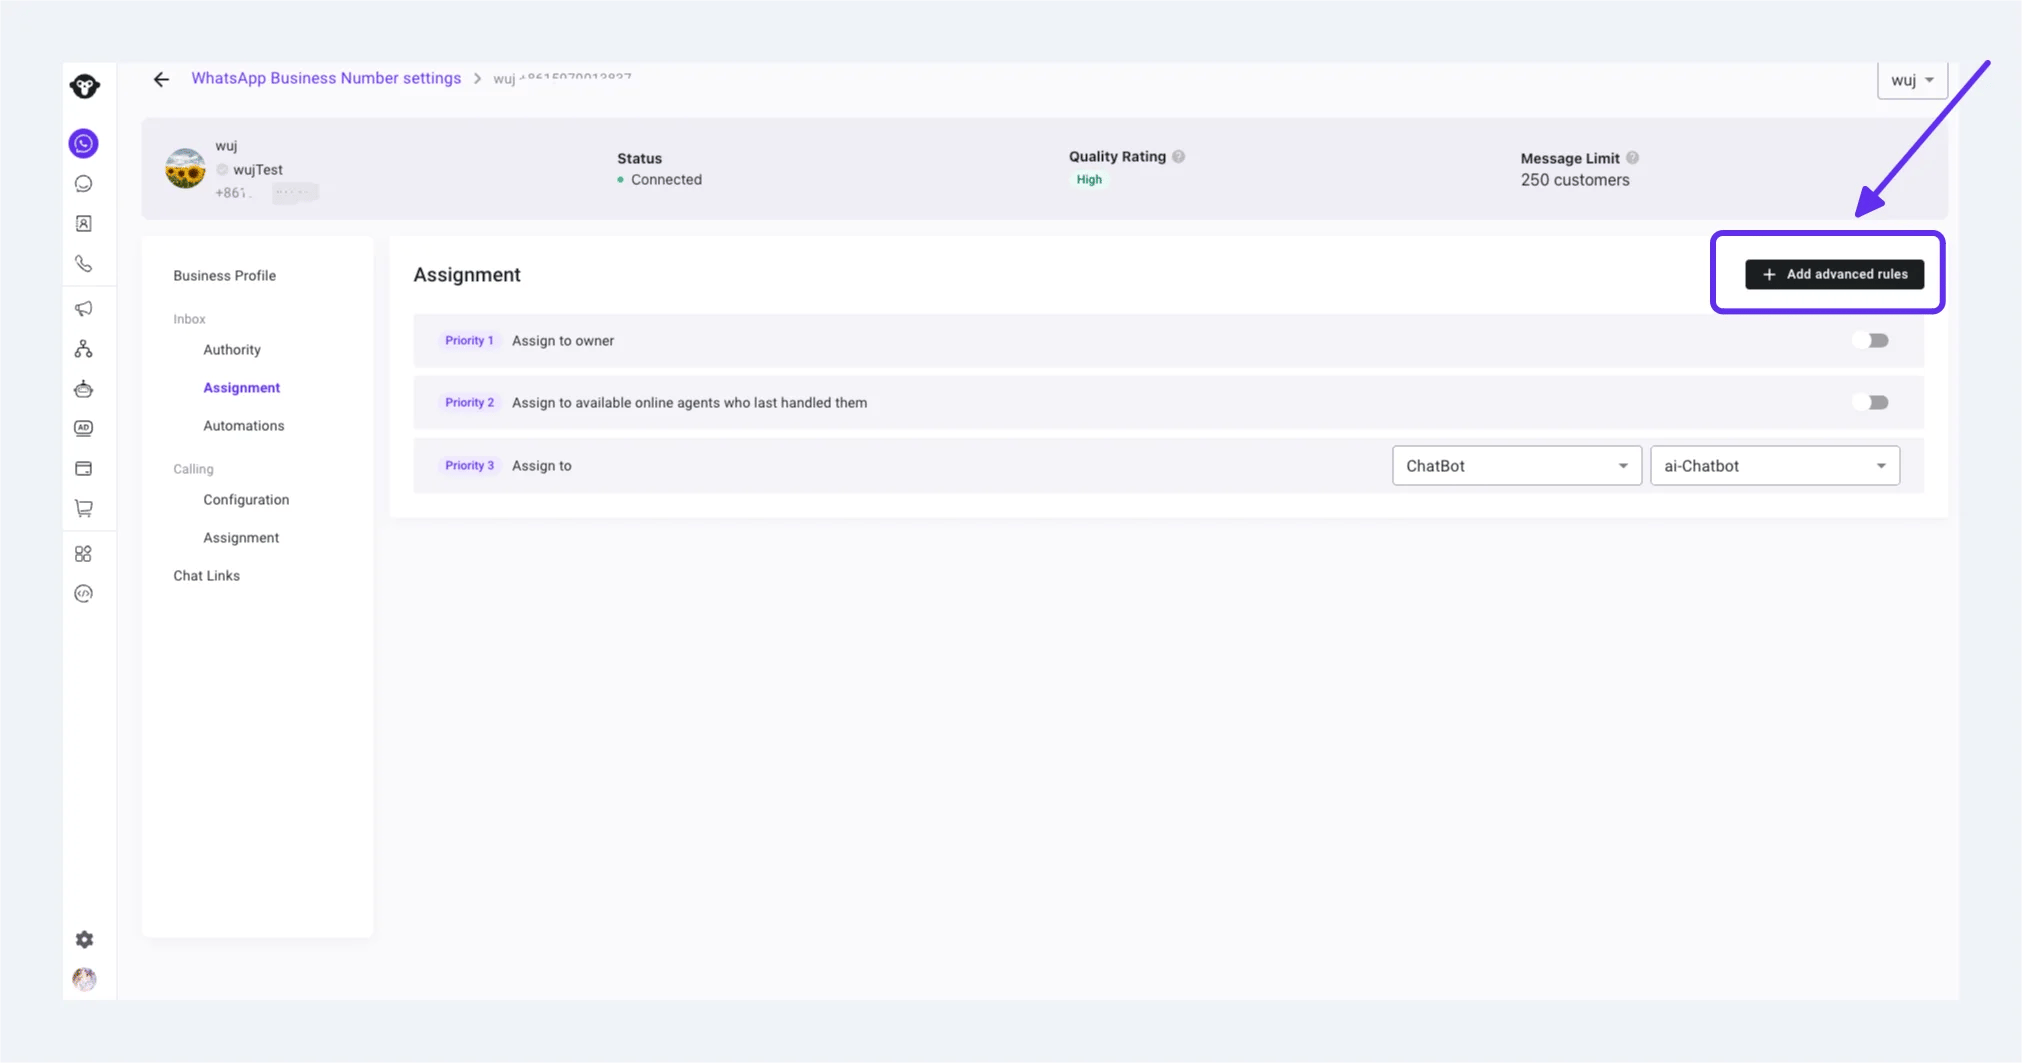
Advanced assignment rules are available on Pro and higher plans. Click **Create advanced assignment rule** to begin.
To reuse an existing rule from another WhatsApp number in the same account, select the rule and choose **Copy**. To build a new flow, choose **Start from scratch**.
### **Advanced assignment rule configuration**
Advanced assignment rules are available on Pro and higher plans. Click **Create advanced assignment rule** to begin.
To reuse an existing rule from another WhatsApp number in the same account, select the rule and choose **Copy**. To build a new flow, choose **Start from scratch**.
 #### **Advanced assignment toolbox**
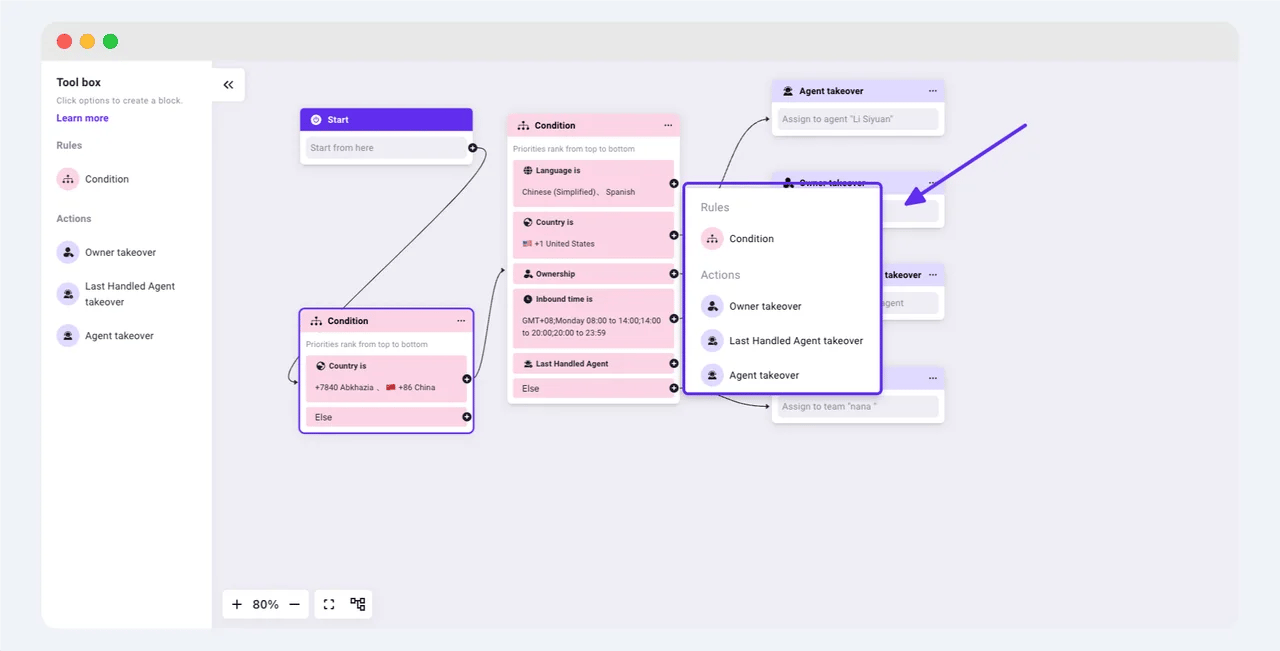
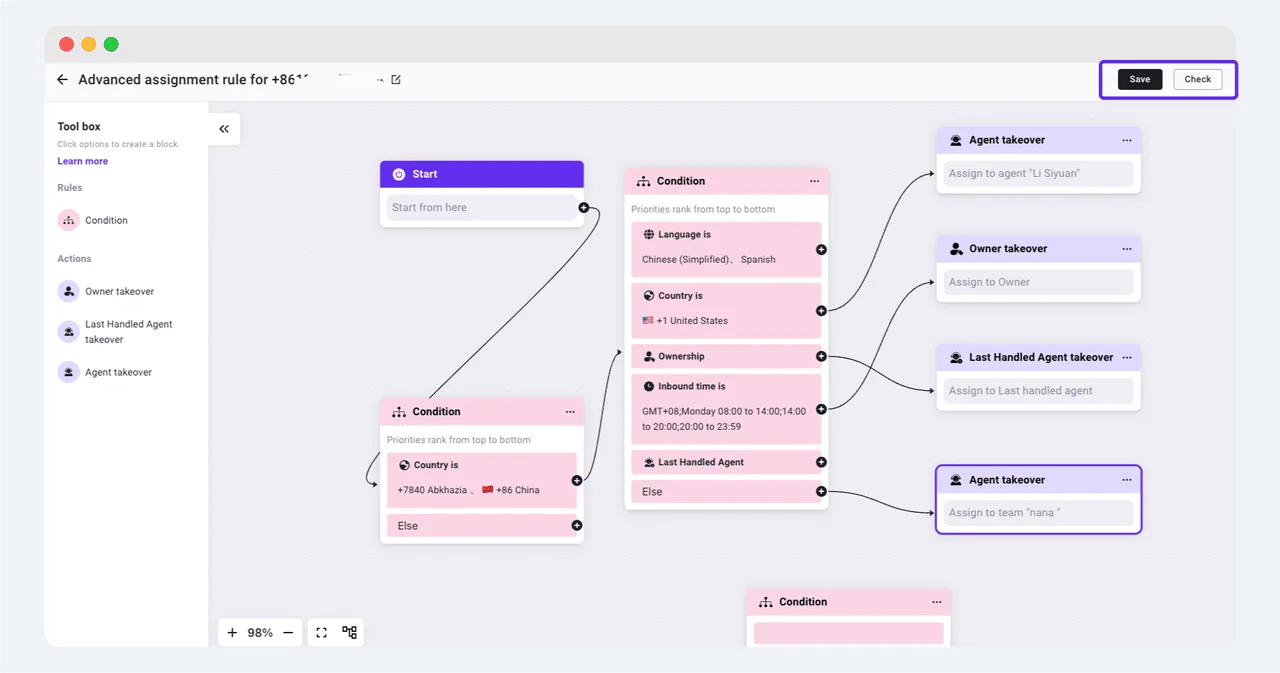
Click the plus node after a module to choose a condition module or action module, or select the module you want to add from the left side, then connect the nodes after configuration.
#### **Advanced assignment toolbox**
Click the plus node after a module to choose a condition module or action module, or select the module you want to add from the left side, then connect the nodes after configuration.
 #### Condition module
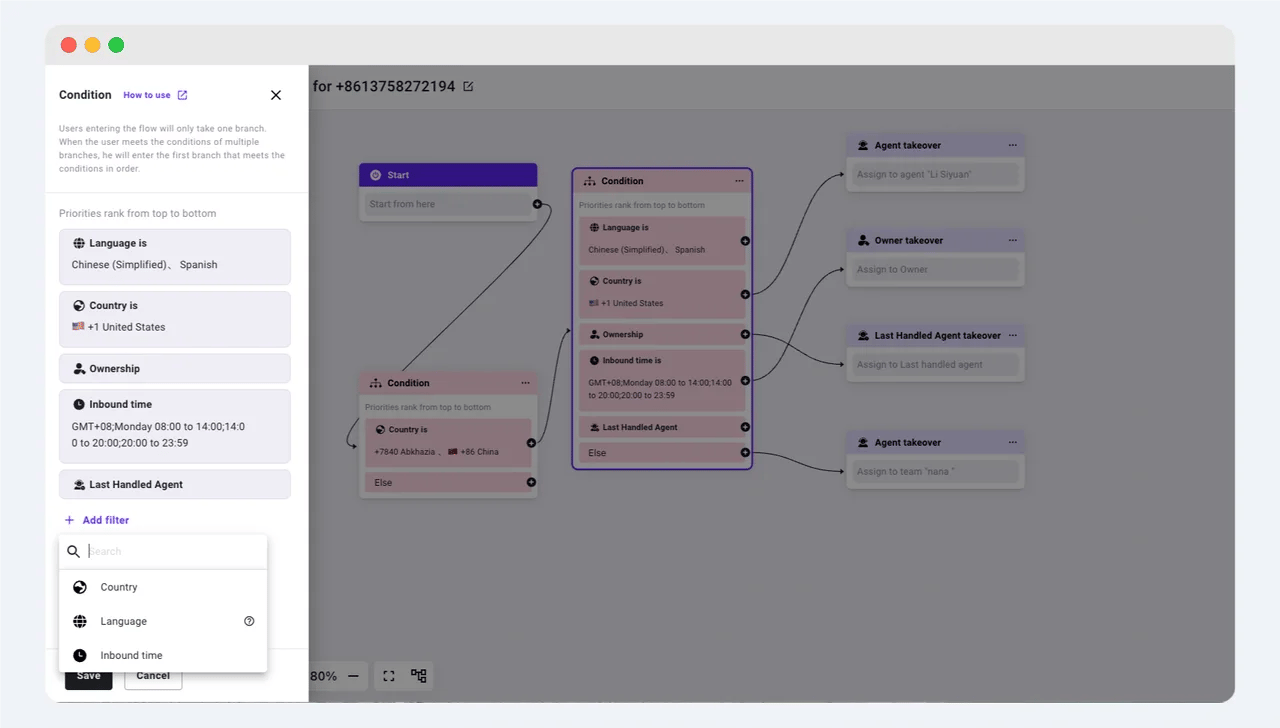
1. Click the Add condition button to choose and add a condition from five types: country, language, ownership, most recent online agent, and message arrival time.
2. The system will evaluate the incoming user's conditions from top to bottom according to the order you configured, and enter the first matching branch and execute the subsequent assignment action. If you do not configure an action module after the condition, the user's conversation will be moved to the \[Unassigned] list.
3. Country: The system will automatically determine the user's country and region based on the mobile phone country code, and match it against the country you configured to decide whether to enter the branch.
4. Language: The system will attempt to identify the language used by the user. After successful identification, it will match against the language you configured to decide whether to enter the branch.
5. Ownership: The system will automatically determine whether the incoming user already has ownership. If ownership is detected, it will enter this condition branch.
6. Most recent online agent: The system will determine whether the agent who last served the user is online. If so, it will enter this condition branch.
7. Message arrival time: The user's message arrival time will be matched against the time range you set. If it matches, it will enter the condition branch.
8. Incoming conversations that do not meet any of the conditions you configured will enter the \[Other] condition branch.
#### Condition module
1. Click the Add condition button to choose and add a condition from five types: country, language, ownership, most recent online agent, and message arrival time.
2. The system will evaluate the incoming user's conditions from top to bottom according to the order you configured, and enter the first matching branch and execute the subsequent assignment action. If you do not configure an action module after the condition, the user's conversation will be moved to the \[Unassigned] list.
3. Country: The system will automatically determine the user's country and region based on the mobile phone country code, and match it against the country you configured to decide whether to enter the branch.
4. Language: The system will attempt to identify the language used by the user. After successful identification, it will match against the language you configured to decide whether to enter the branch.
5. Ownership: The system will automatically determine whether the incoming user already has ownership. If ownership is detected, it will enter this condition branch.
6. Most recent online agent: The system will determine whether the agent who last served the user is online. If so, it will enter this condition branch.
7. Message arrival time: The user's message arrival time will be matched against the time range you set. If it matches, it will enter the condition branch.
8. Incoming conversations that do not meet any of the conditions you configured will enter the \[Other] condition branch.
 #### Agent takeover module
1. User-owned agent takeover: Assign the conversation to the agent who owns the user, regardless of whether the agent is online.
2. Most recent online agent takeover: Assign the conversation to the agent who last served the user, if that agent is online.
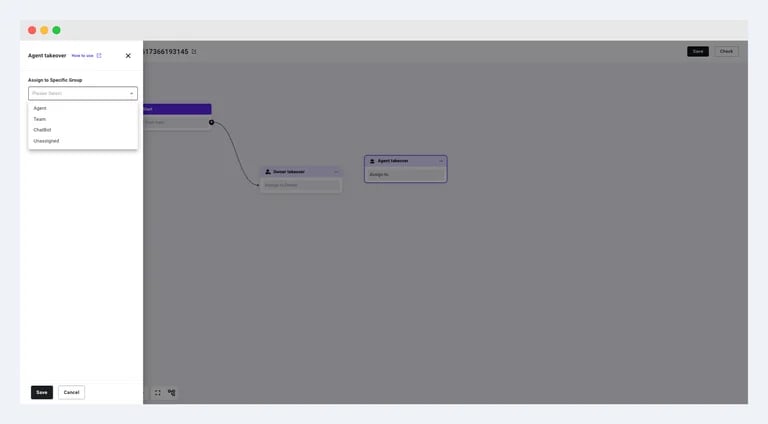
3. Custom agent takeover: Customize the assigned agent as needed.
1. If you choose to assign to a specific agent, the conversation will be assigned directly to that agent regardless of online status.
2. If you choose to assign to a team, the conversation will be assigned to that team and then routed to a specific agent according to the team's internal rules.
3. Assign to AI Agent: You can choose a configured AI Agent.
4. Assign to the Unassigned inbox: The conversation will automatically enter the Unassigned inbox.
#### Agent takeover module
1. User-owned agent takeover: Assign the conversation to the agent who owns the user, regardless of whether the agent is online.
2. Most recent online agent takeover: Assign the conversation to the agent who last served the user, if that agent is online.
3. Custom agent takeover: Customize the assigned agent as needed.
1. If you choose to assign to a specific agent, the conversation will be assigned directly to that agent regardless of online status.
2. If you choose to assign to a team, the conversation will be assigned to that team and then routed to a specific agent according to the team's internal rules.
3. Assign to AI Agent: You can choose a configured AI Agent.
4. Assign to the Unassigned inbox: The conversation will automatically enter the Unassigned inbox.
 #### Canvas configuration, saving, and editing
1. After finishing component editing, you can drag the lines on the nodes to connect these modules. Using the buttons in the lower-left corner of the canvas, you can zoom in, zoom out, or automatically resize the canvas to a suitable size, and also arrange the modules neatly.
2. After completing all configurations, click the \[Check] button in the upper-right corner to verify whether your configuration is compliant.
3. The system will automatically generate a fixed-name rule for this advanced assignment rule, and you can modify it in the upper-left corner.
4. After the check is complete, click the \[Save] button to save your settings.
#### Canvas configuration, saving, and editing
1. After finishing component editing, you can drag the lines on the nodes to connect these modules. Using the buttons in the lower-left corner of the canvas, you can zoom in, zoom out, or automatically resize the canvas to a suitable size, and also arrange the modules neatly.
2. After completing all configurations, click the \[Check] button in the upper-right corner to verify whether your configuration is compliant.
3. The system will automatically generate a fixed-name rule for this advanced assignment rule, and you can modify it in the upper-left corner.
4. After the check is complete, click the \[Save] button to save your settings.
 1. After completing the configuration and returning to the advanced configuration list page, click the \[Edit] button to enter the canvas and edit the rule.
2. When you are ready, turn on the advanced assignment switch to make it take effect.
1. After completing the configuration and returning to the advanced configuration list page, click the \[Edit] button to enter the canvas and edit the rule.
2. When you are ready, turn on the advanced assignment switch to make it take effect.
 ### **Automation rule configuration**
On the automation rules page, set up Inbox automatic reply rules, including: welcome message, new user icebreaker, automatic replies for unassigned conversations, automatic replies when agents do not respond in time, and automatic conversation closure.
### **Automation rule configuration**
On the automation rules page, set up Inbox automatic reply rules, including: welcome message, new user icebreaker, automatic replies for unassigned conversations, automatic replies when agents do not respond in time, and automatic conversation closure.
 * Icebreaker: A set of customizable, clickable text prompts that appear in a new user's chat window for the first time. They help customers quickly understand the services the business provides and can trigger the AI Agent to execute specific workflows.
* Away message: When all agents are not available, auto-reply a message and lead customer to leave a message.
* Auto-reply for in queue conversations: Inbox will automatically respond to in queue conversations, ensuring timely responses.
* Auto-reply for delayed agent responses: When an agent does not reply for more than a specified duration of time, an automatic reply will be sent.
* Auto-close conversation: Close inbox conversations automatically if the customer doesn't respond within your set time.
* CSAT: Send a satisfaction survey to customers after the conversation is closed. Only works on the human agent's conversation.
### Customer tag system configuration
Go to Contct > Settings > [Tags](https://www.ycloud.com/console/#/app/contact/settings/tags) to manage system tags
Agents can use predefined tags to better manage and filter customers
* Icebreaker: A set of customizable, clickable text prompts that appear in a new user's chat window for the first time. They help customers quickly understand the services the business provides and can trigger the AI Agent to execute specific workflows.
* Away message: When all agents are not available, auto-reply a message and lead customer to leave a message.
* Auto-reply for in queue conversations: Inbox will automatically respond to in queue conversations, ensuring timely responses.
* Auto-reply for delayed agent responses: When an agent does not reply for more than a specified duration of time, an automatic reply will be sent.
* Auto-close conversation: Close inbox conversations automatically if the customer doesn't respond within your set time.
* CSAT: Send a satisfaction survey to customers after the conversation is closed. Only works on the human agent's conversation.
### Customer tag system configuration
Go to Contct > Settings > [Tags](https://www.ycloud.com/console/#/app/contact/settings/tags) to manage system tags
Agents can use predefined tags to better manage and filter customers
 ### Canned response configuration
Go to **Settings > Inbox > Canned response** to configure account-wide preset replies that agents can quickly use in chats.
### Canned response configuration
Go to **Settings > Inbox > Canned response** to configure account-wide preset replies that agents can quickly use in chats.
 You have completed the basic Inbox configuration. You can also assign conversations to an [AI Agent](/en/documentation/agents/ai-agent/how-to-create-and-configure-an-ai-agent) outside your team's working hours.
## View real-time reports
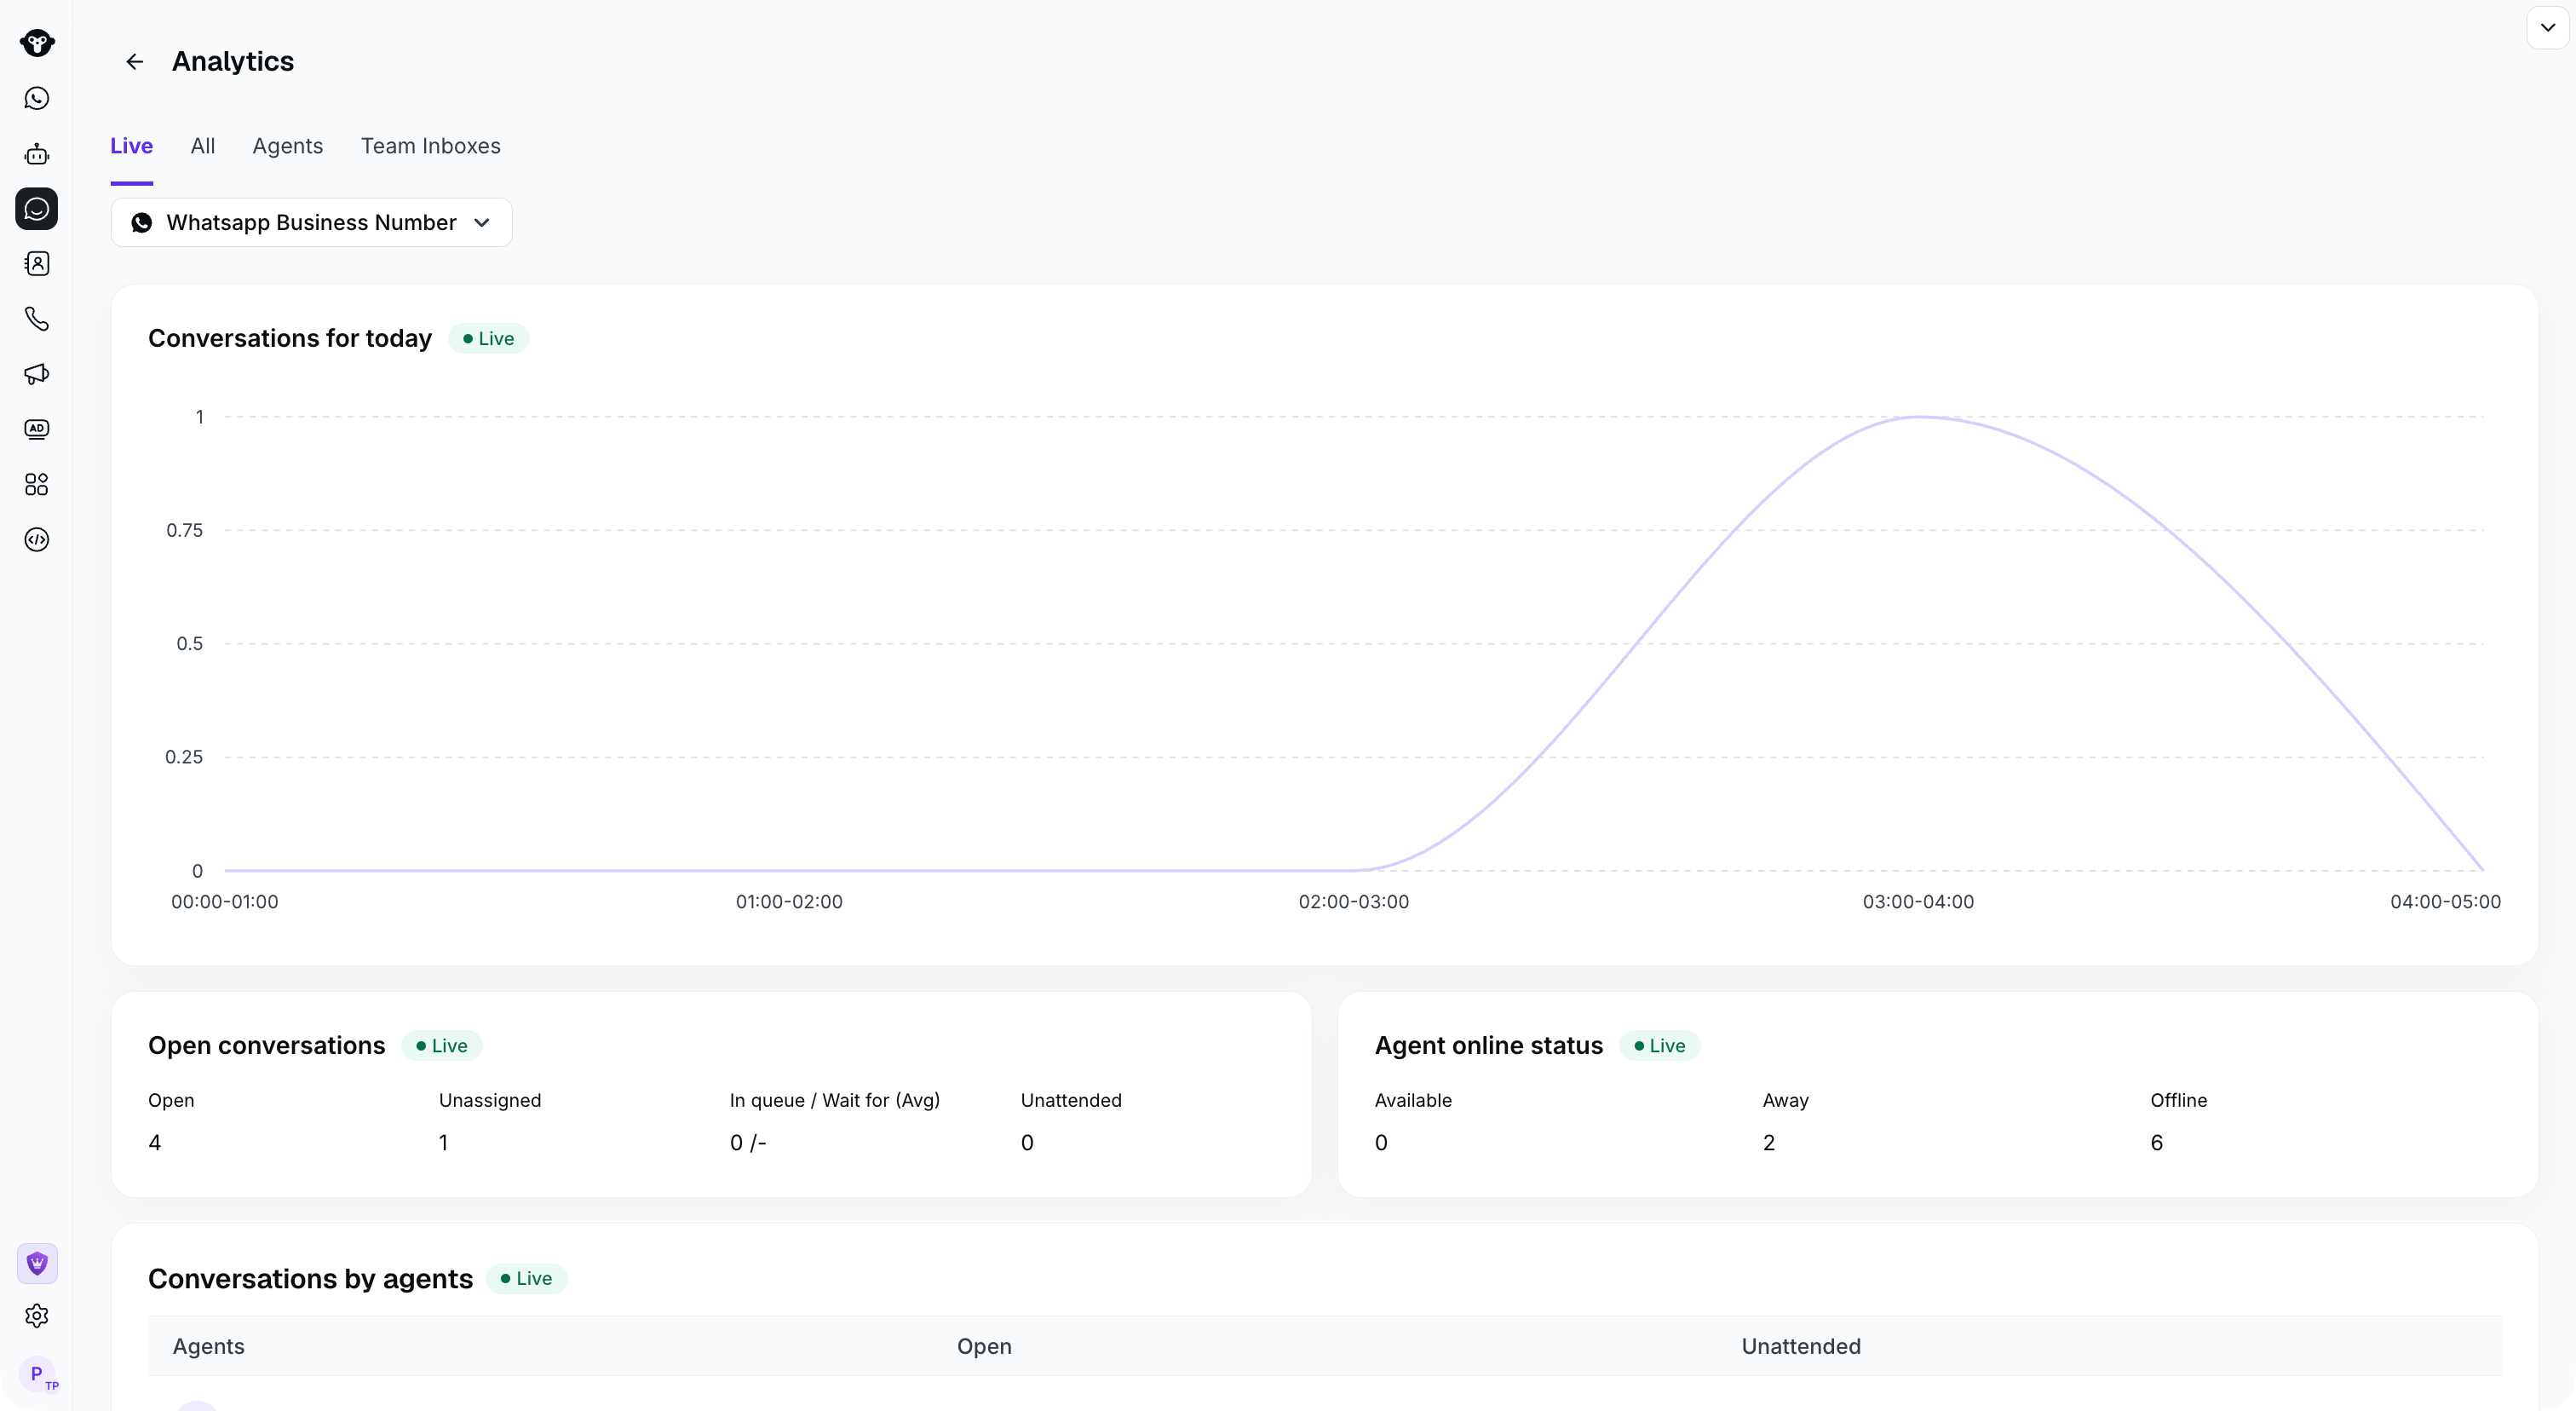
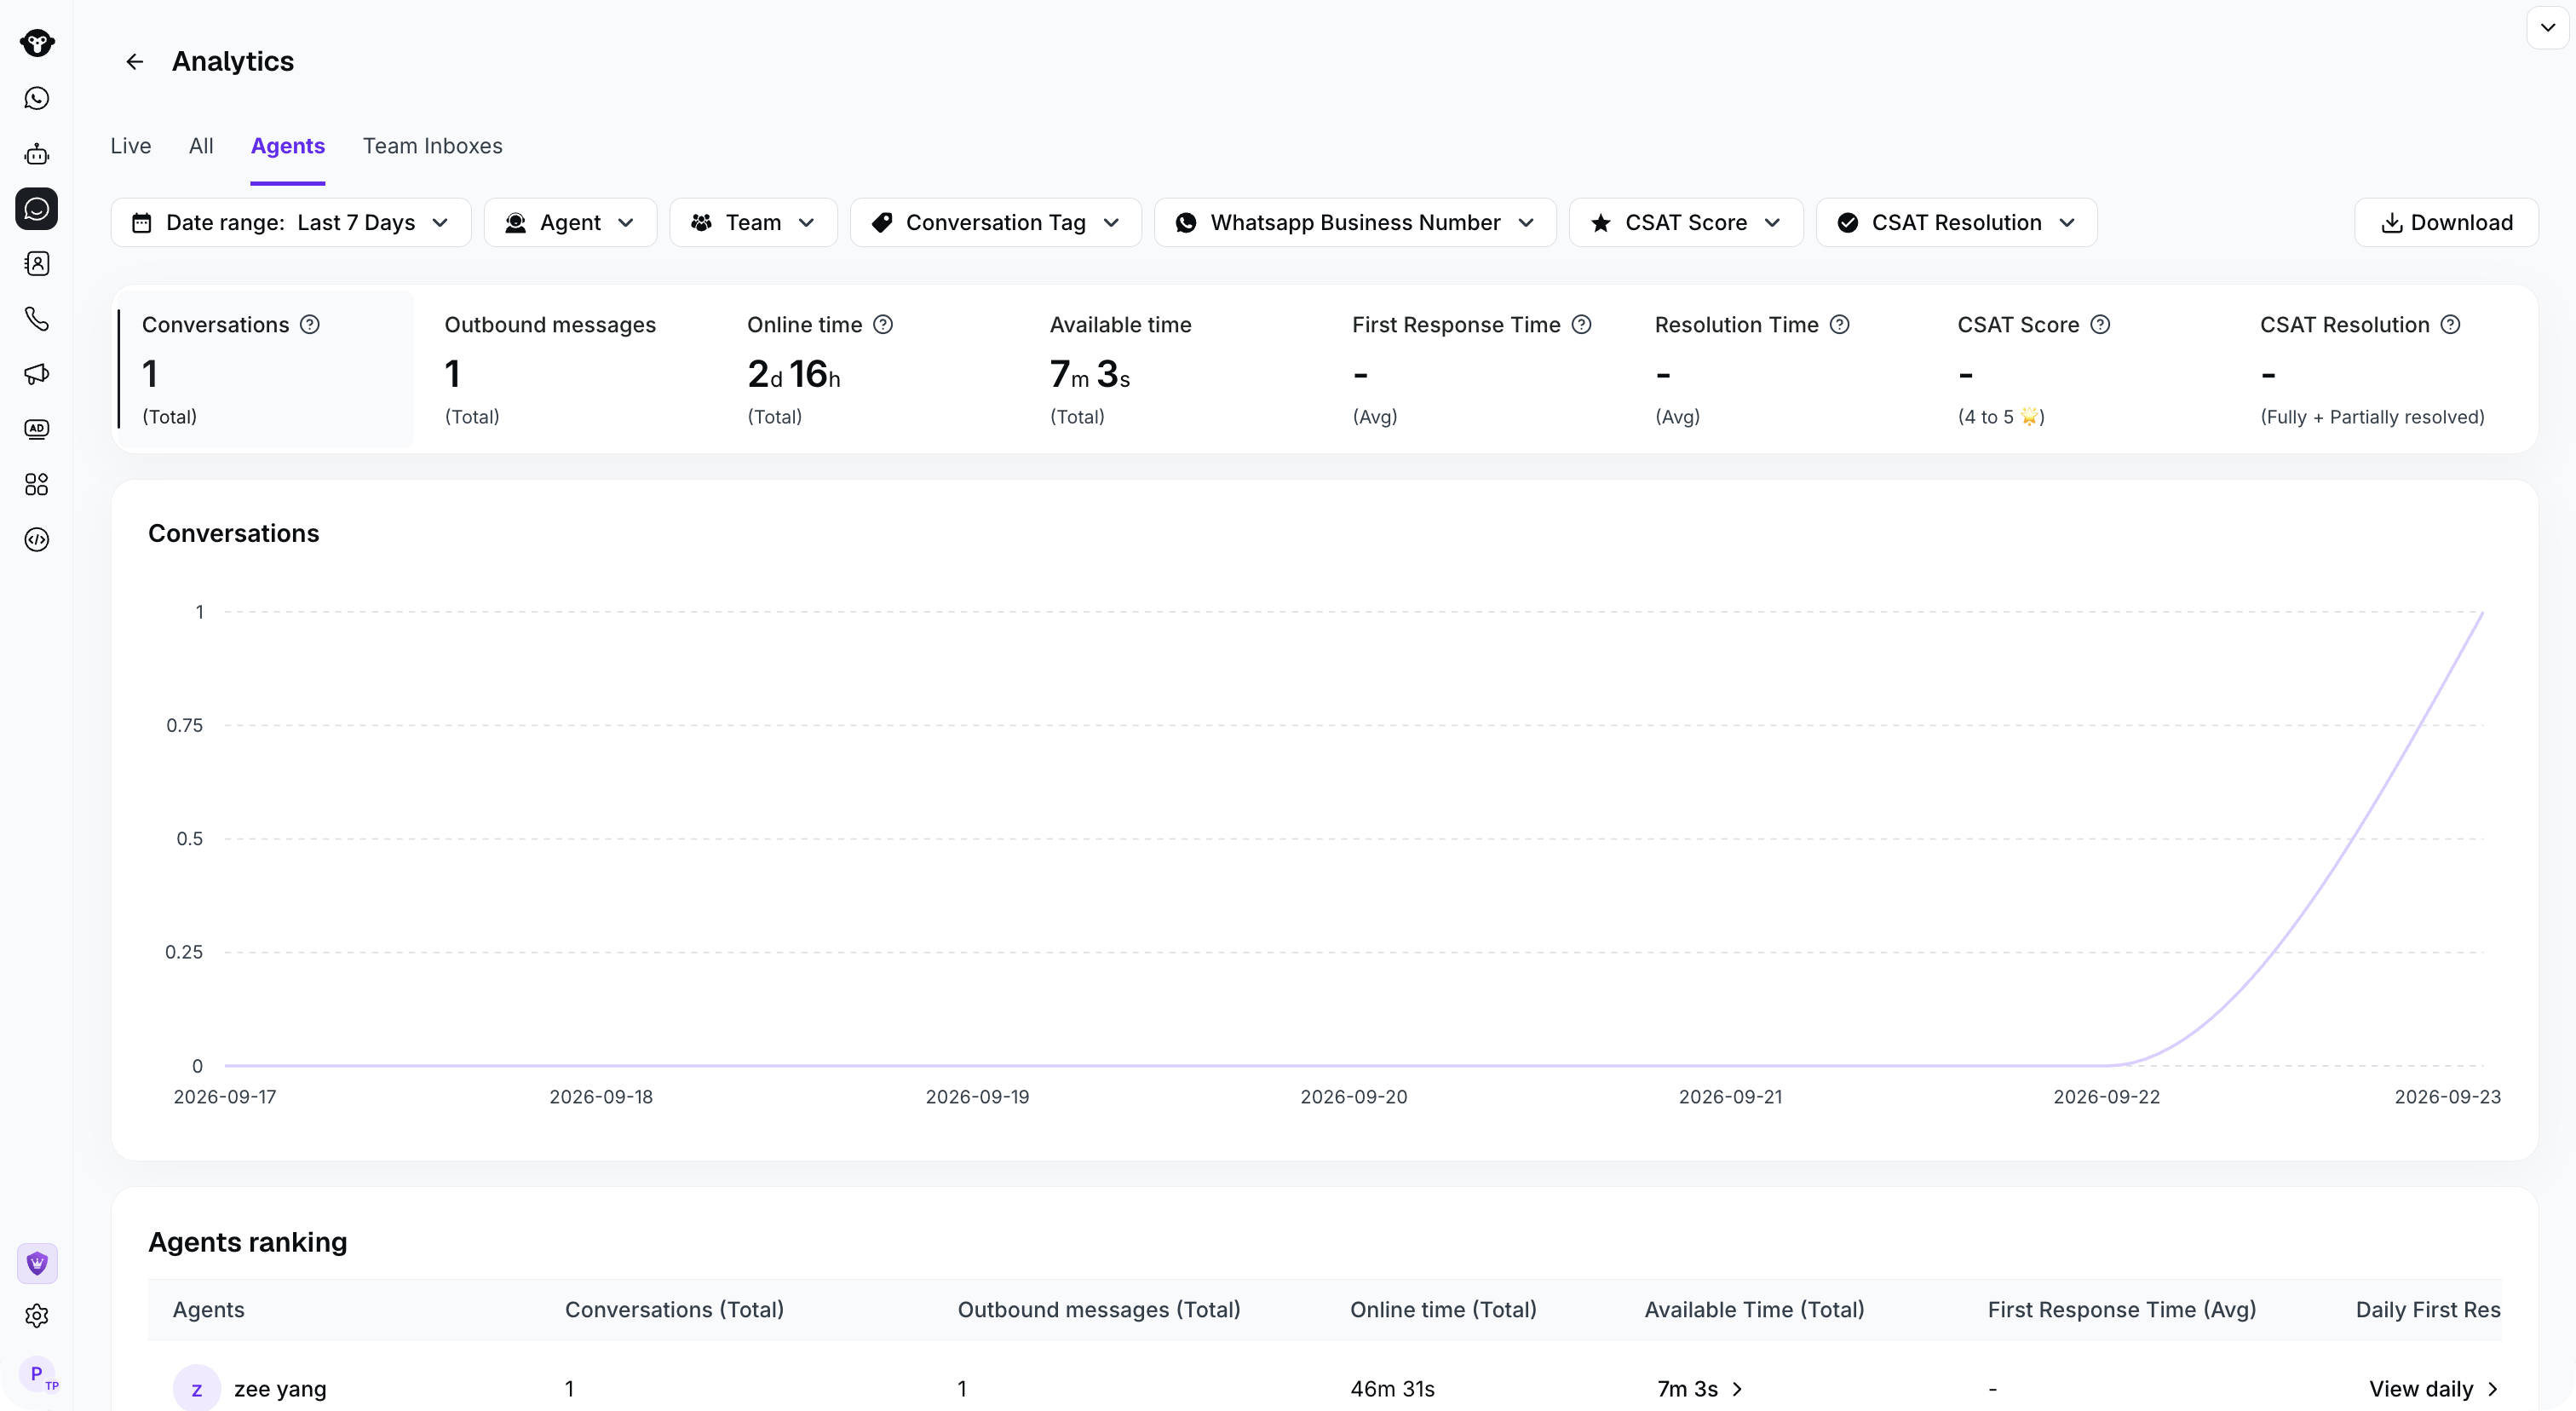
As a supervisor, you need to understand your team's handling status in real time. You can go to Inbox > [Analytics ](https://www.ycloud.com/console/#/app/inbox/analytics) to view real-time statistics.
For detailed guidance, see the documentation: [Inbox analytics](https://www.ycloud.com/console/#/app/inbox/analytics)
You have completed the basic Inbox configuration. You can also assign conversations to an [AI Agent](/en/documentation/agents/ai-agent/how-to-create-and-configure-an-ai-agent) outside your team's working hours.
## View real-time reports
As a supervisor, you need to understand your team's handling status in real time. You can go to Inbox > [Analytics ](https://www.ycloud.com/console/#/app/inbox/analytics) to view real-time statistics.
For detailed guidance, see the documentation: [Inbox analytics](https://www.ycloud.com/console/#/app/inbox/analytics)
 This documentation is built and hosted on [Mintlify](https://mintlify.com), a developer documentation platform.