> ## Documentation Index
> Fetch the complete documentation index at: https://docs.ycloud.com/llms.txt
> Use this file to discover all available pages before exploring further.

# 连接外部应用内容

> 将飞书或 Notion 内容连接到 AI Agent 知识库。

除了直接在 YCloud 中创建或上传知识外，您还可以连接外部应用中的内容。目前支持飞书和 Notion。

## 打开外部应用连接

1. 打开您的 AI Agent 并选择 **Knowledge**。
2. 点击 **Add knowledge**。
3. 选择 **Connect external app content**。
4. 选择 **From Feishu** 或 **From Notion**。
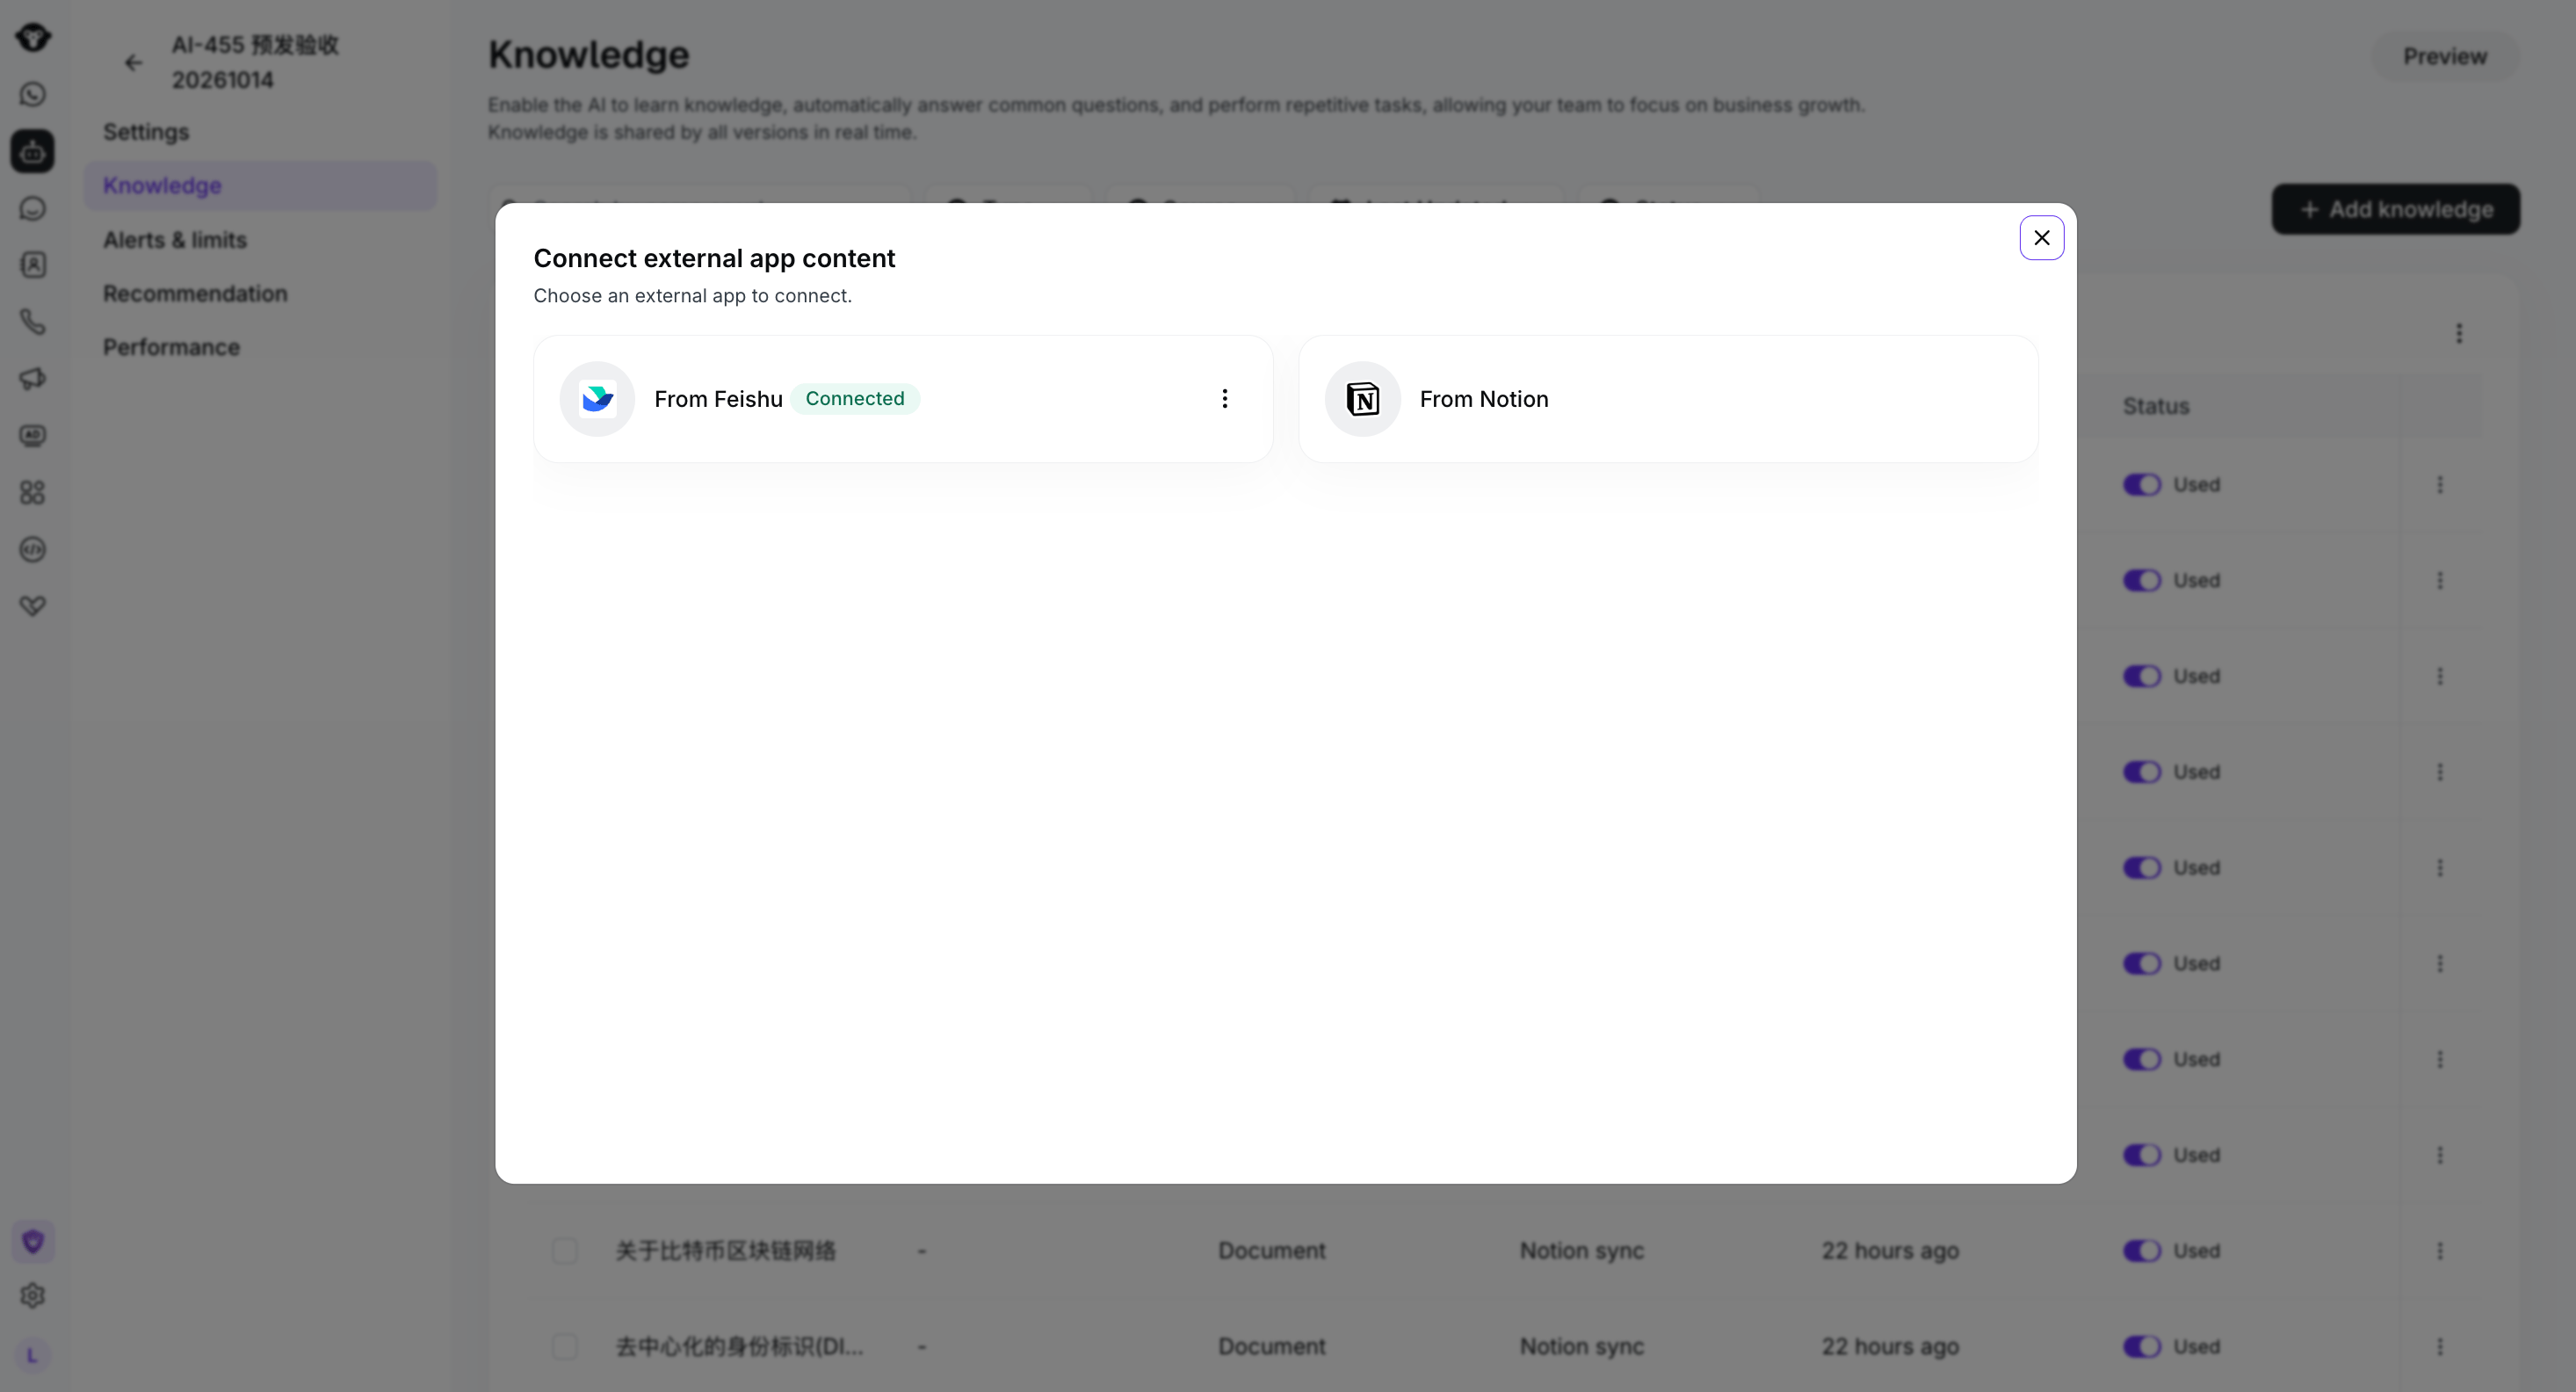
<Frame caption="选择飞书或 Notion 作为外部内容来源。">
  <img src="https://mintcdn.com/lchnan/p6uaxB33LOv7N6yH/product-assets/ai-agent-knowledge-2026-10-15/connect-external-app-content.png?fit=max&auto=format&n=p6uaxB33LOv7N6yH&q=85&s=336b93e292935f9b8c738fd374751f5d" alt="显示 From Feishu 和 From Notion 选项的 Connect external app content 对话框。" width="2932" height="1584" data-path="product-assets/ai-agent-knowledge-2026-10-15/connect-external-app-content.png" />
</Frame>

## 授权飞书

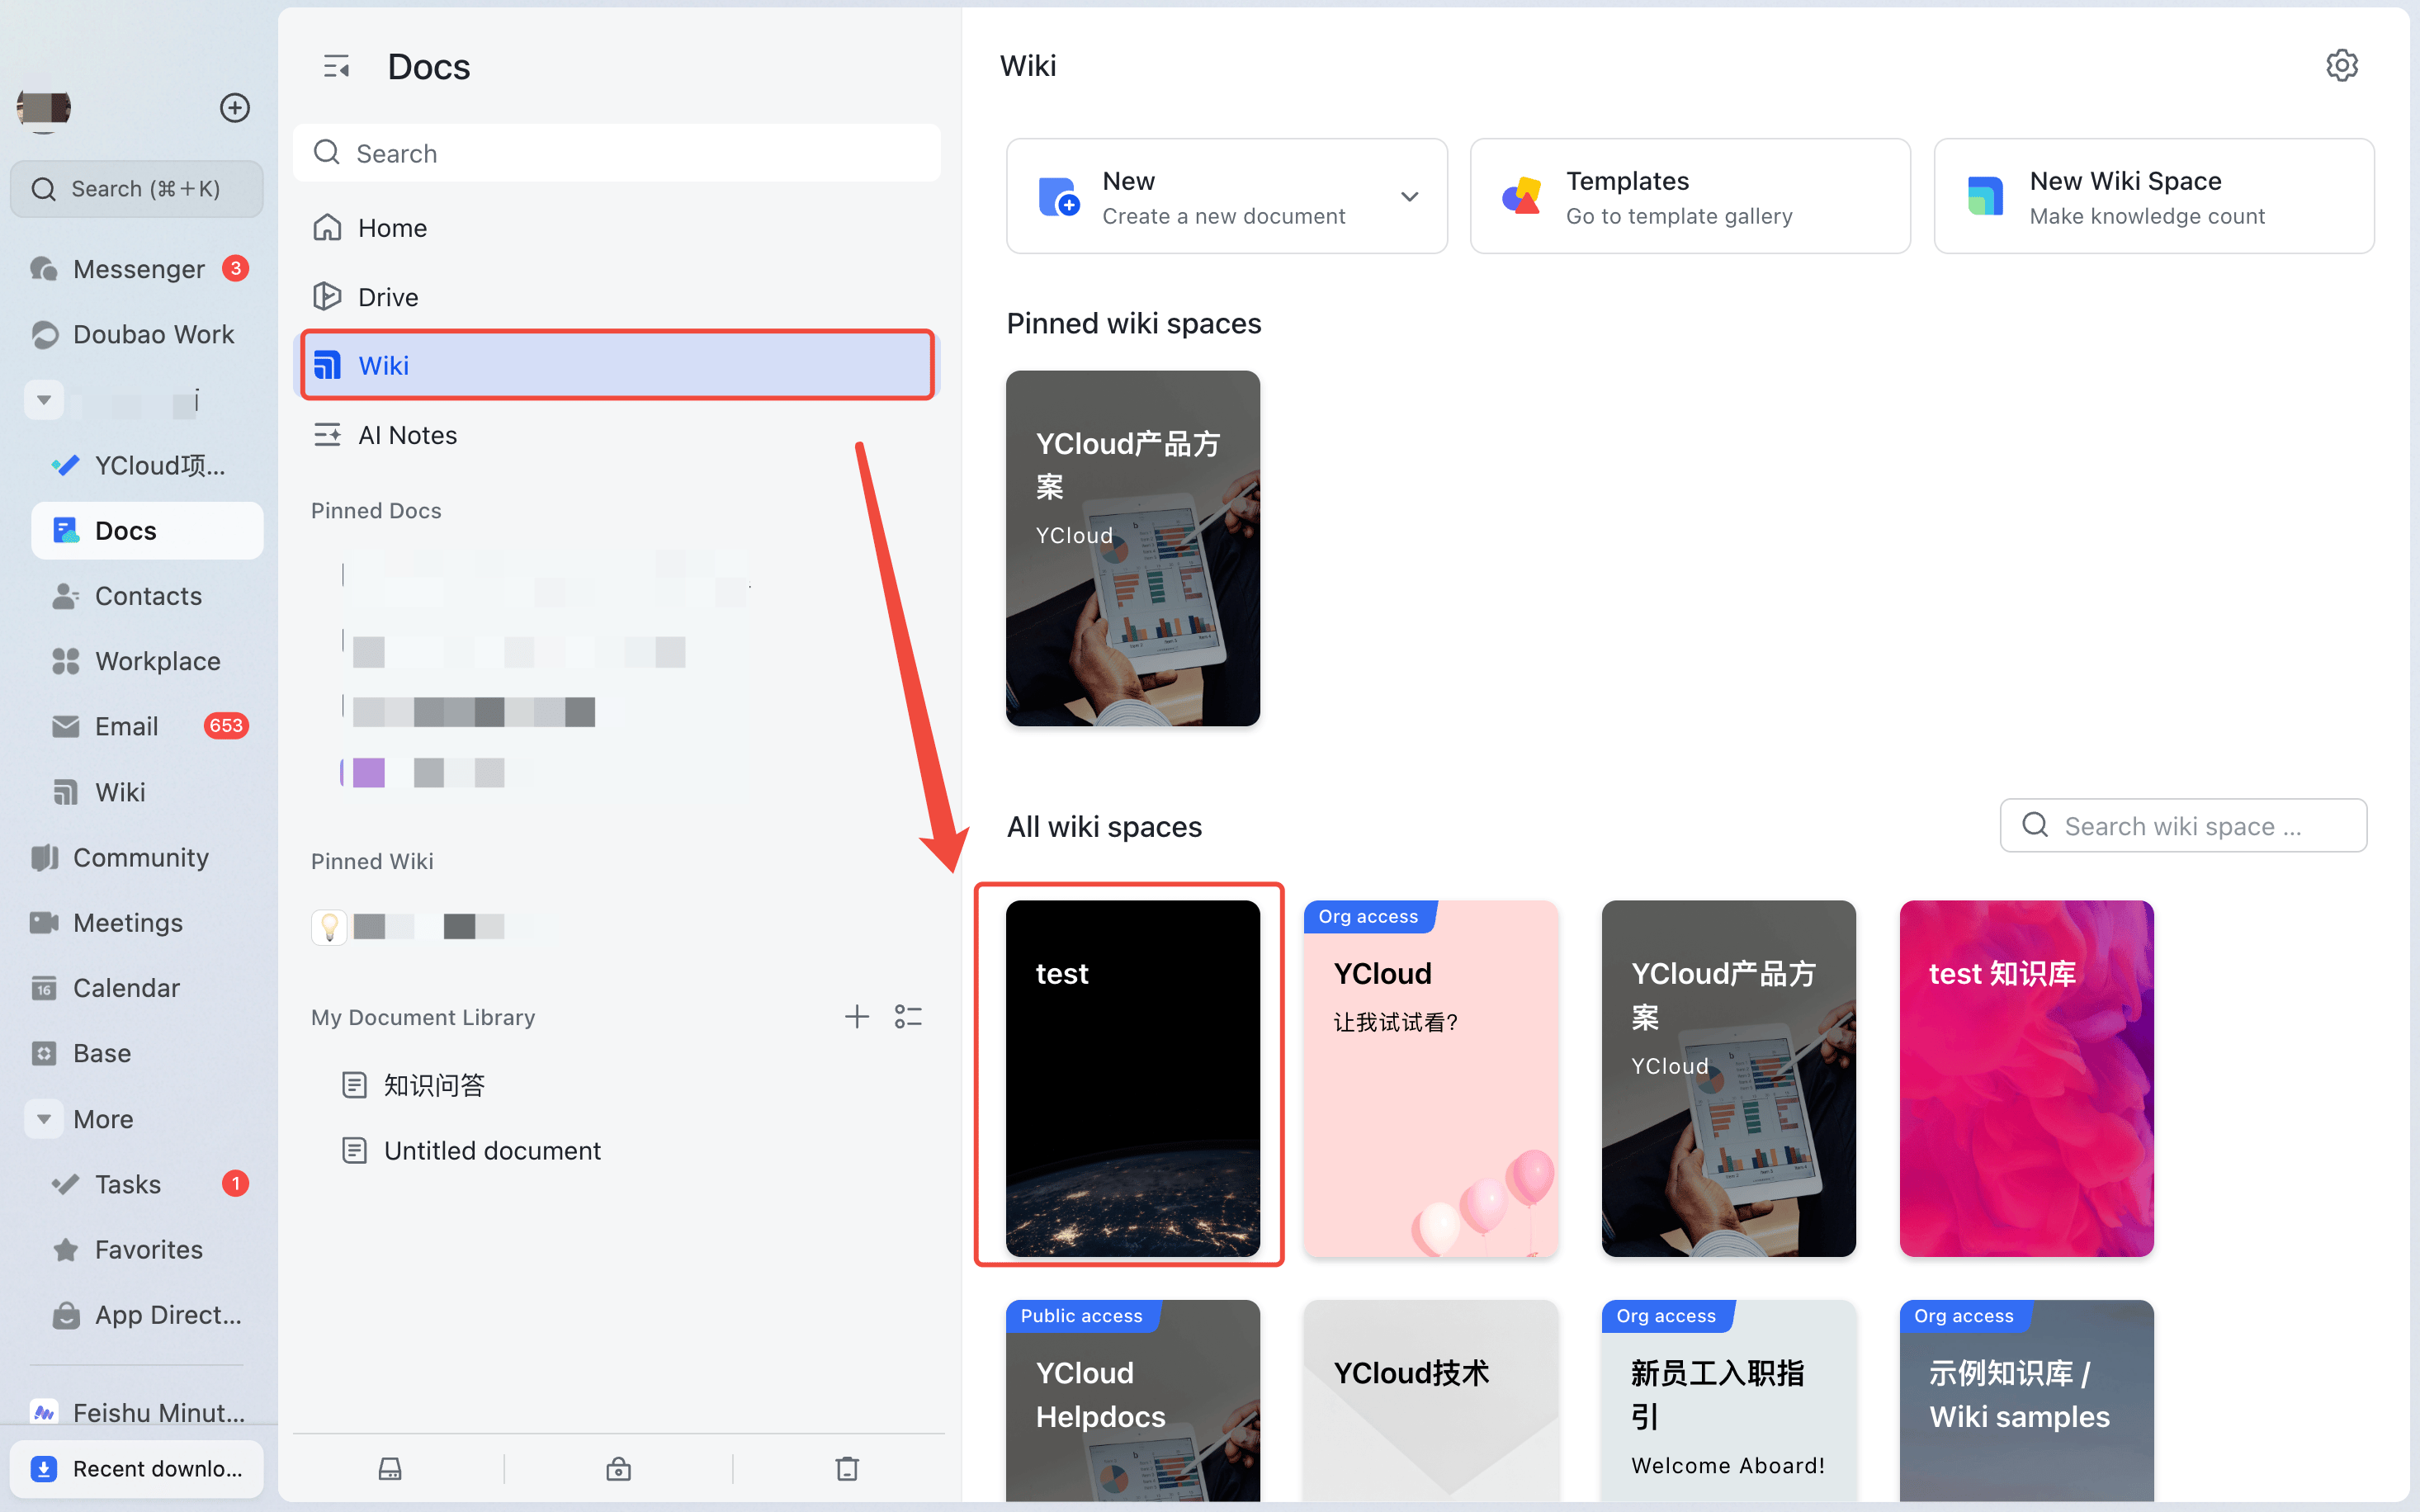
连接飞书内容之前，请为飞书机器人授予 AI Agent 所需的每个 Wiki 空间的 Viewer 权限。请确保机器人已创建，并记下其名称。

1. 在飞书云文档中打开 **Wiki**，然后打开要授权的 Wiki 空间。

<Frame caption="打开希望 AI Agent 访问的飞书 Wiki 空间。">
  <img src="https://mintcdn.com/lchnan/p6uaxB33LOv7N6yH/product-assets/ai-agent-knowledge-2026-10-15/feishu-open-knowledge-base.png?fit=max&auto=format&n=p6uaxB33LOv7N6yH&q=85&s=abde38f502b5a8ccce15afaaa2967cdd" alt="高亮显示一个 Wiki 空间的飞书 Wiki 页面。" width="2932" height="1832" data-path="product-assets/ai-agent-knowledge-2026-10-15/feishu-open-knowledge-base.png" />
</Frame>

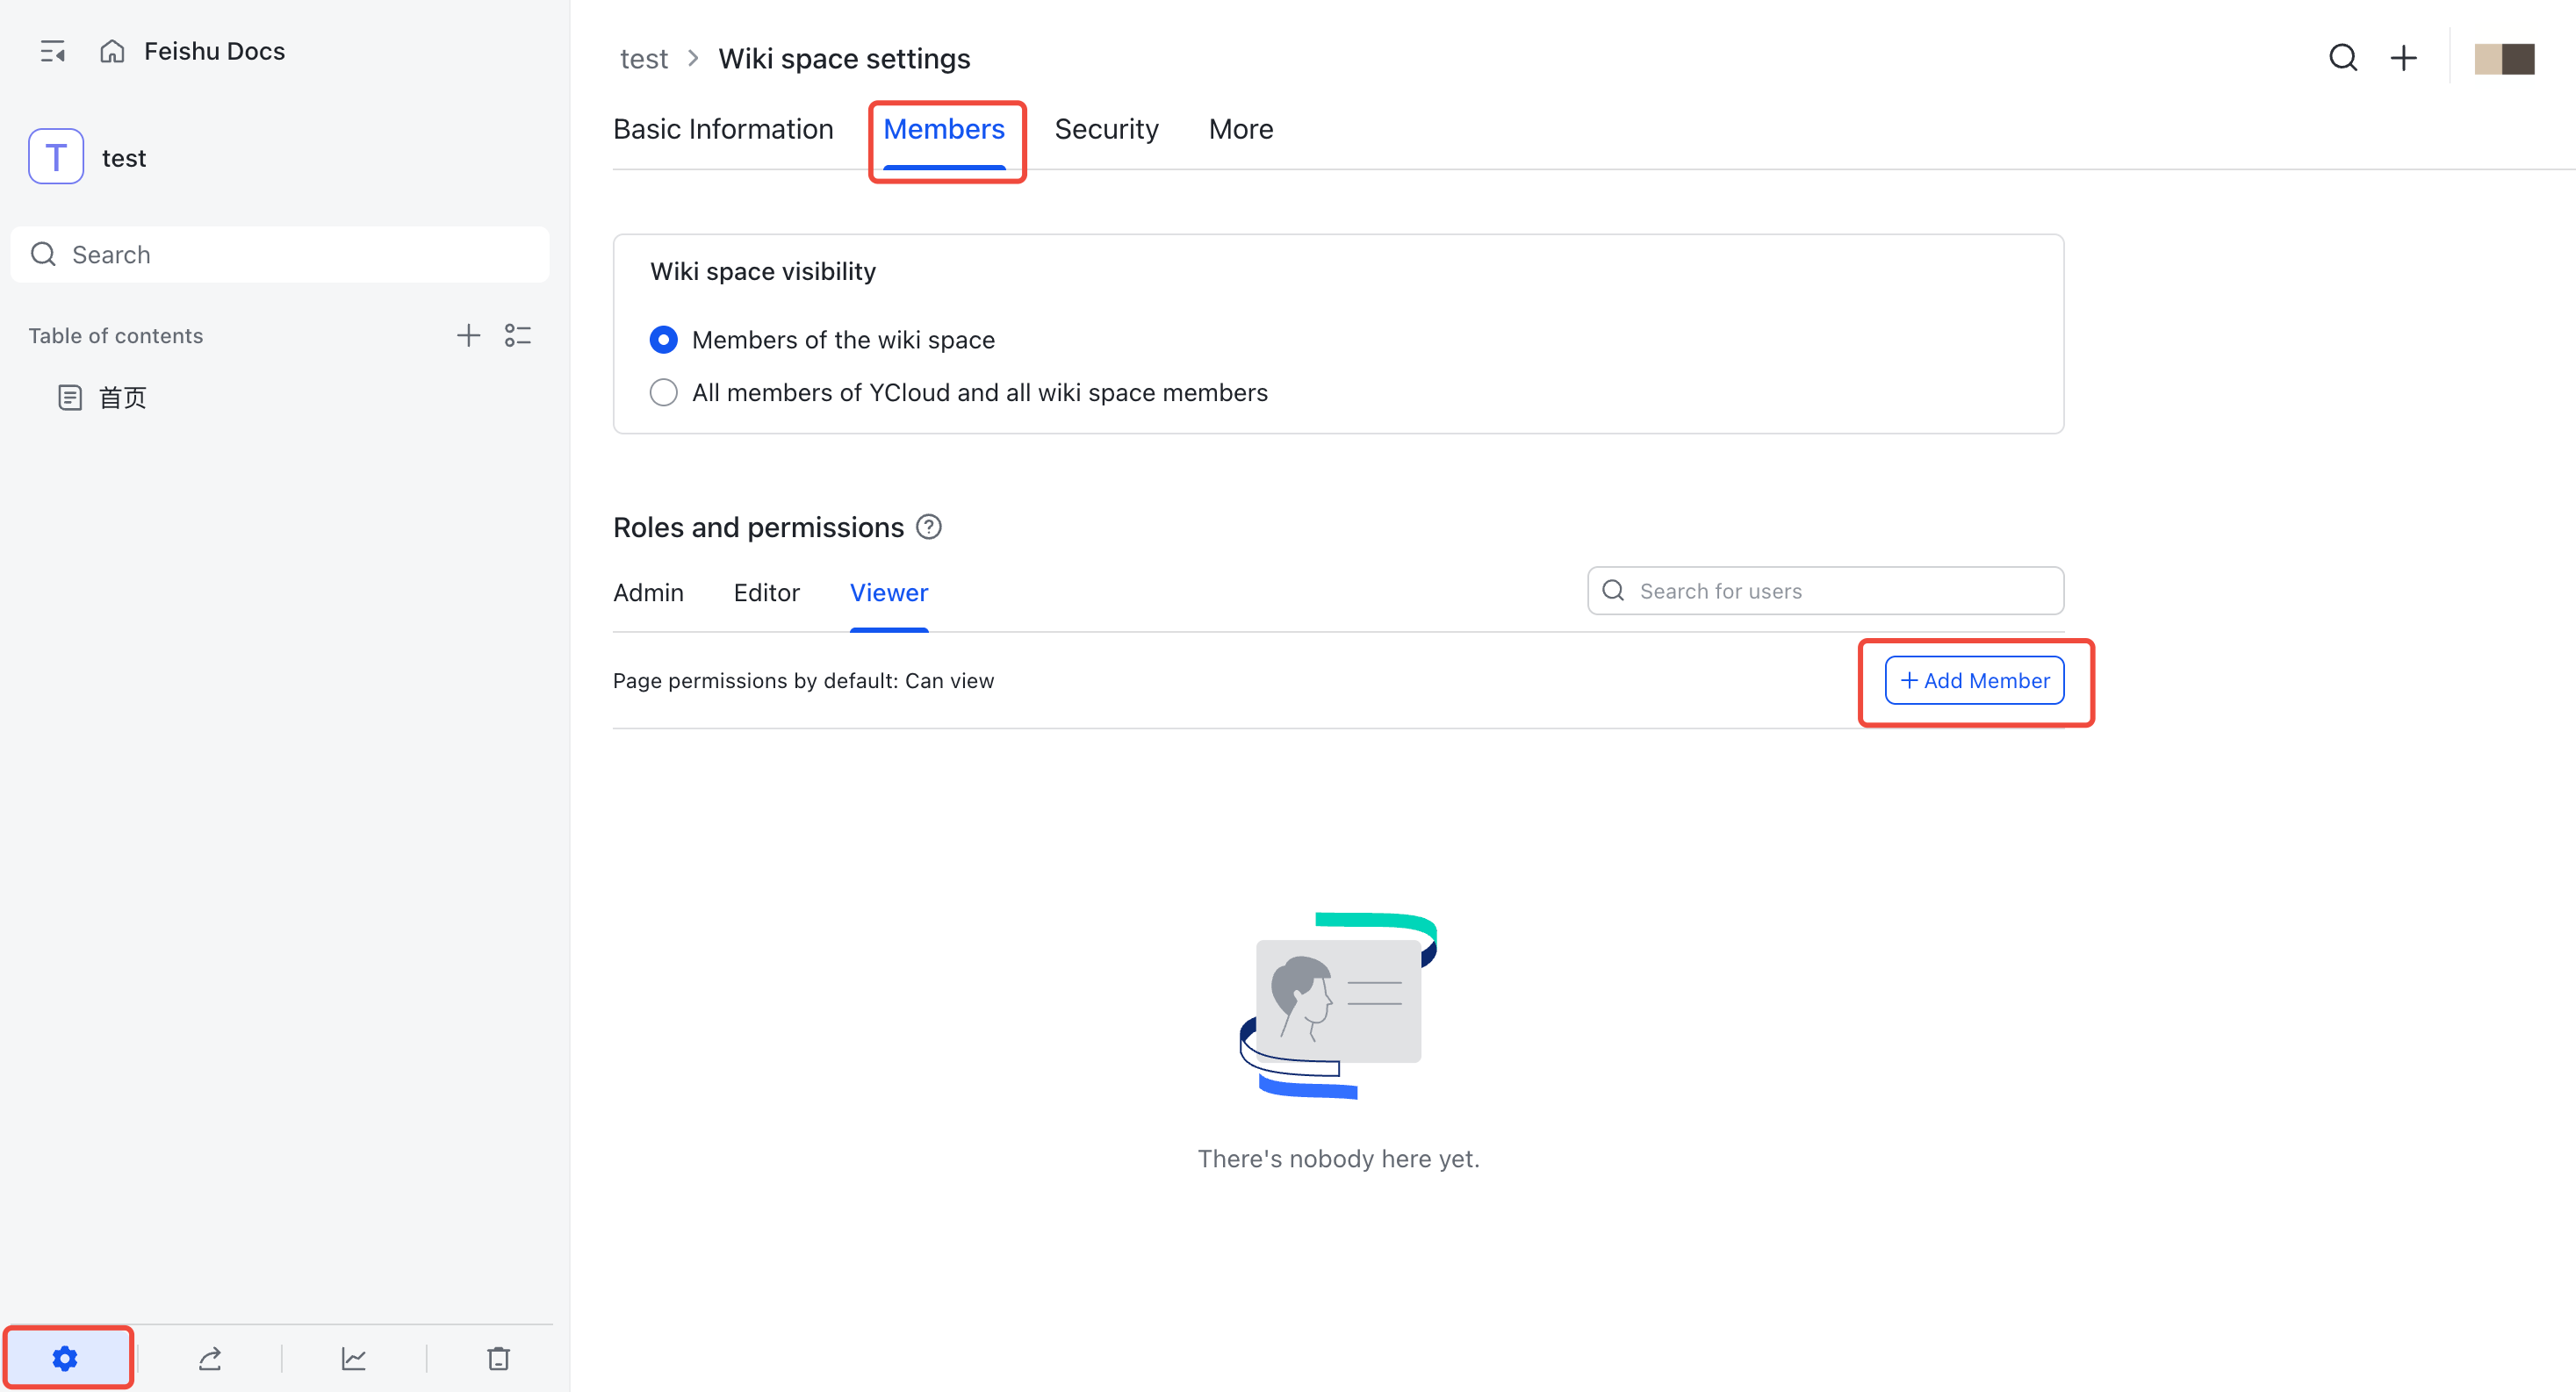
2. 点击左下角的 **Settings**。
3. 打开 **Members** 标签页。
4. 在 **Roles and permissions** 下选择 **Viewer**，然后点击 **Add Member**。

<Frame caption="打开 Members，选择 Viewer，然后添加成员。">
  <img src="https://mintcdn.com/lchnan/p6uaxB33LOv7N6yH/product-assets/ai-agent-knowledge-2026-10-15/feishu-reader-members.png?fit=max&auto=format&n=p6uaxB33LOv7N6yH&q=85&s=0628ac592ab03fe90c5e31742c7b6b77" alt="显示 Members 标签页、Viewer 角色和 Add Member 按钮的飞书 Wiki 空间设置。" width="2934" height="1586" data-path="product-assets/ai-agent-knowledge-2026-10-15/feishu-reader-members.png" />
</Frame>

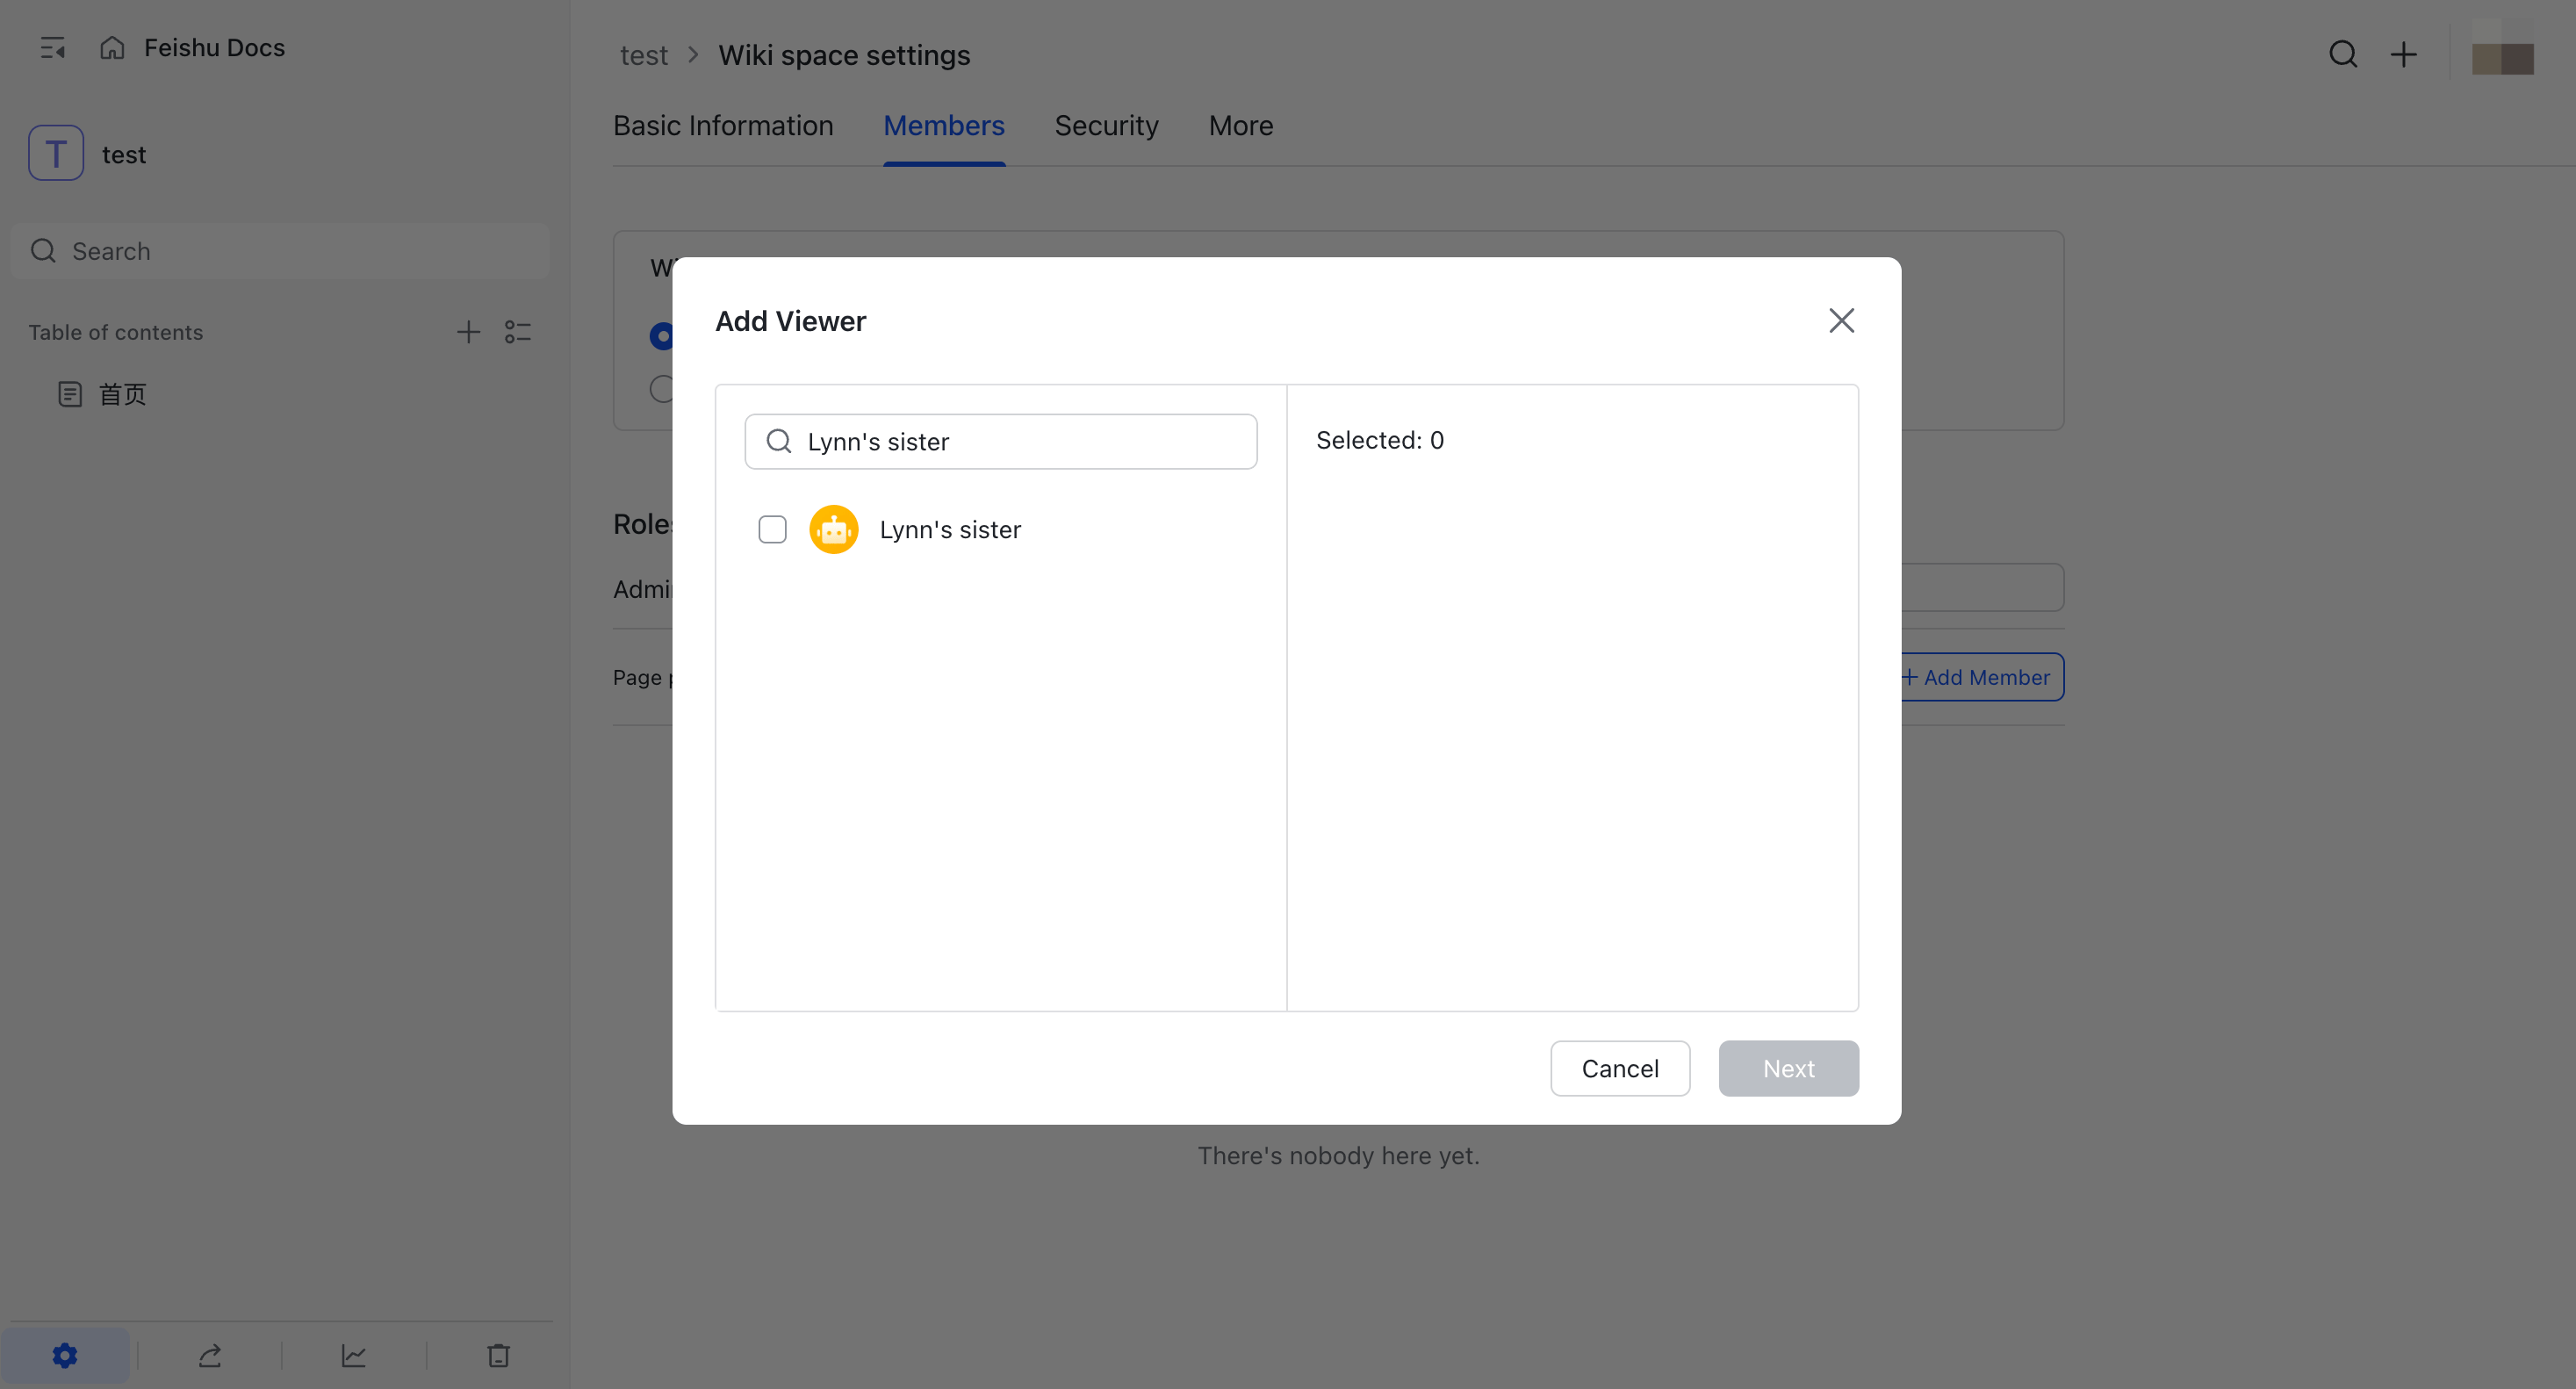
5. 按名称搜索飞书机器人并将其选中。

<Frame caption="搜索并选择 AI Agent 将使用的飞书机器人。">
  <img src="https://mintcdn.com/lchnan/p6uaxB33LOv7N6yH/product-assets/ai-agent-knowledge-2026-10-15/feishu-search-bot.png?fit=max&auto=format&n=p6uaxB33LOv7N6yH&q=85&s=fc4254e2c292a6218830e6793c53b53a" alt="在搜索结果中显示飞书机器人的 Add Viewer 对话框。" width="2934" height="1582" data-path="product-assets/ai-agent-knowledge-2026-10-15/feishu-search-bot.png" />
</Frame>

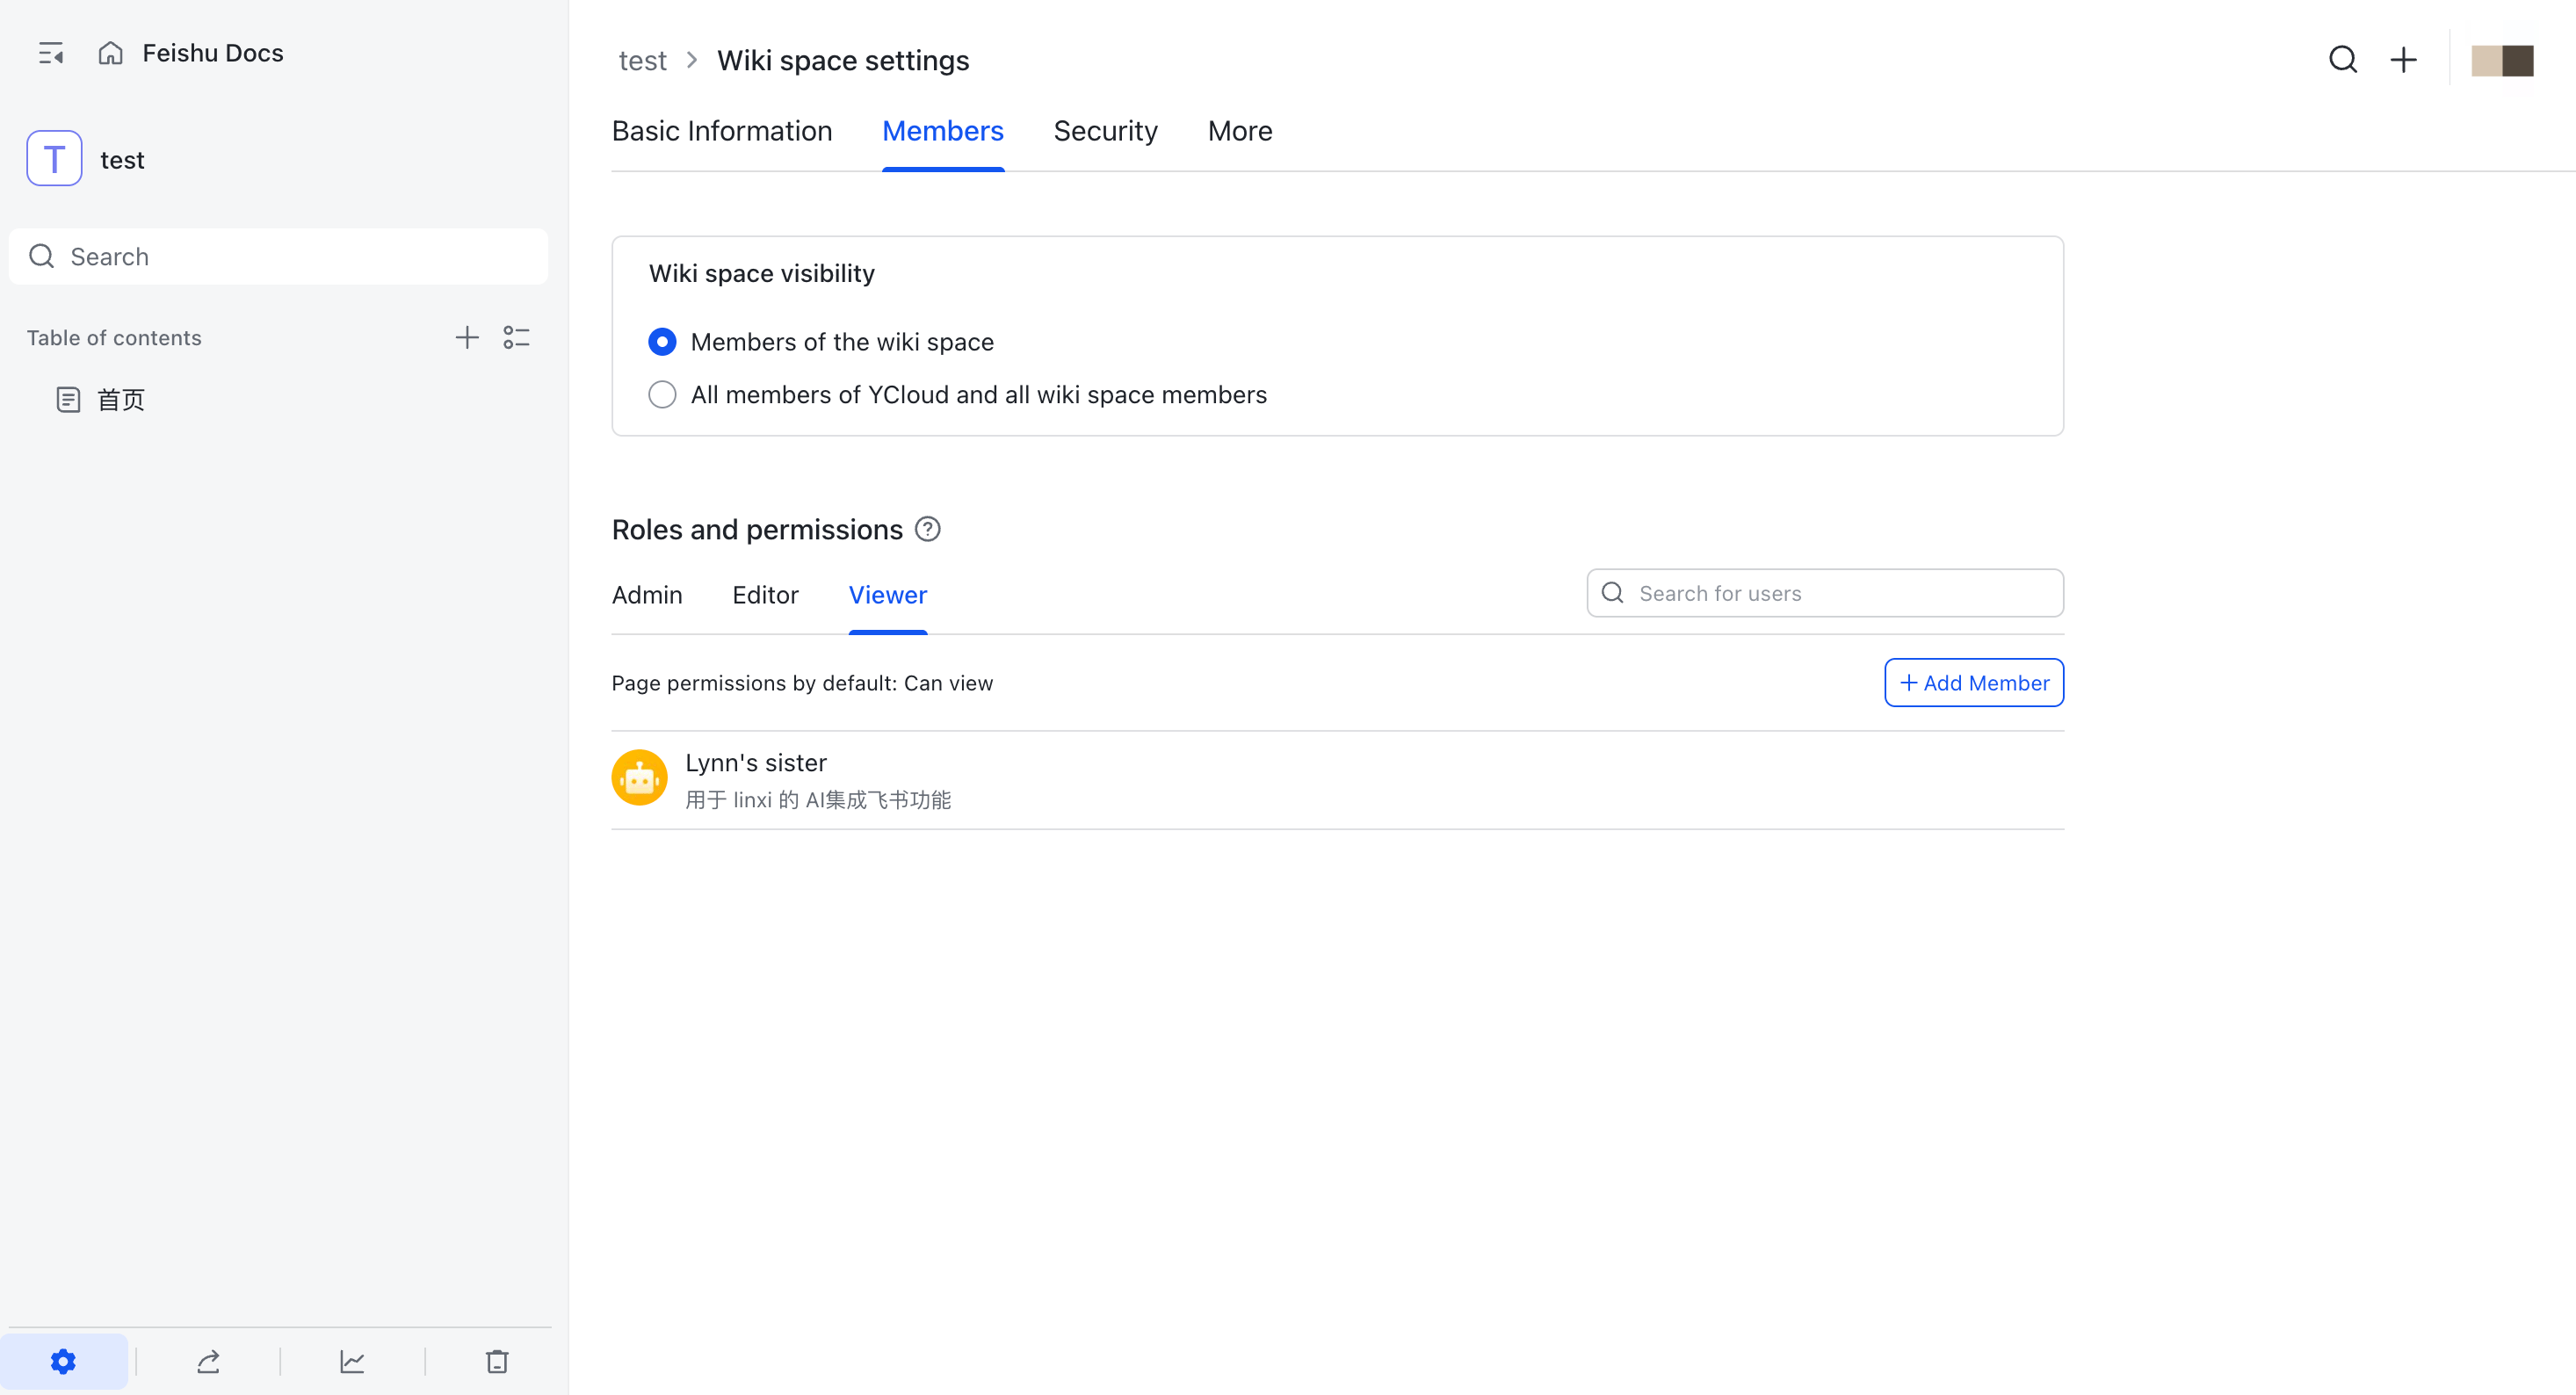
6. 完成添加，并确认机器人显示在 **Viewer** 下。

<Frame caption="确认飞书机器人拥有 Wiki 空间的 Viewer 权限。">
  <img src="https://mintcdn.com/lchnan/p6uaxB33LOv7N6yH/product-assets/ai-agent-knowledge-2026-10-15/feishu-bot-reader-added.png?fit=max&auto=format&n=p6uaxB33LOv7N6yH&q=85&s=db9366a898ff647d58c076addf2a532d" alt="在 Viewer 下显示机器人的飞书 Wiki 空间设置。" width="2932" height="1588" data-path="product-assets/ai-agent-knowledge-2026-10-15/feishu-bot-reader-added.png" />
</Frame>

机器人获得读取权限后，返回 YCloud 并选择 **From Feishu** 继续连接外部内容。如果 AI Agent 已有可用的飞书连接，该选项会显示 **Connected**。

## 授权 Notion

### 首次授权 Notion

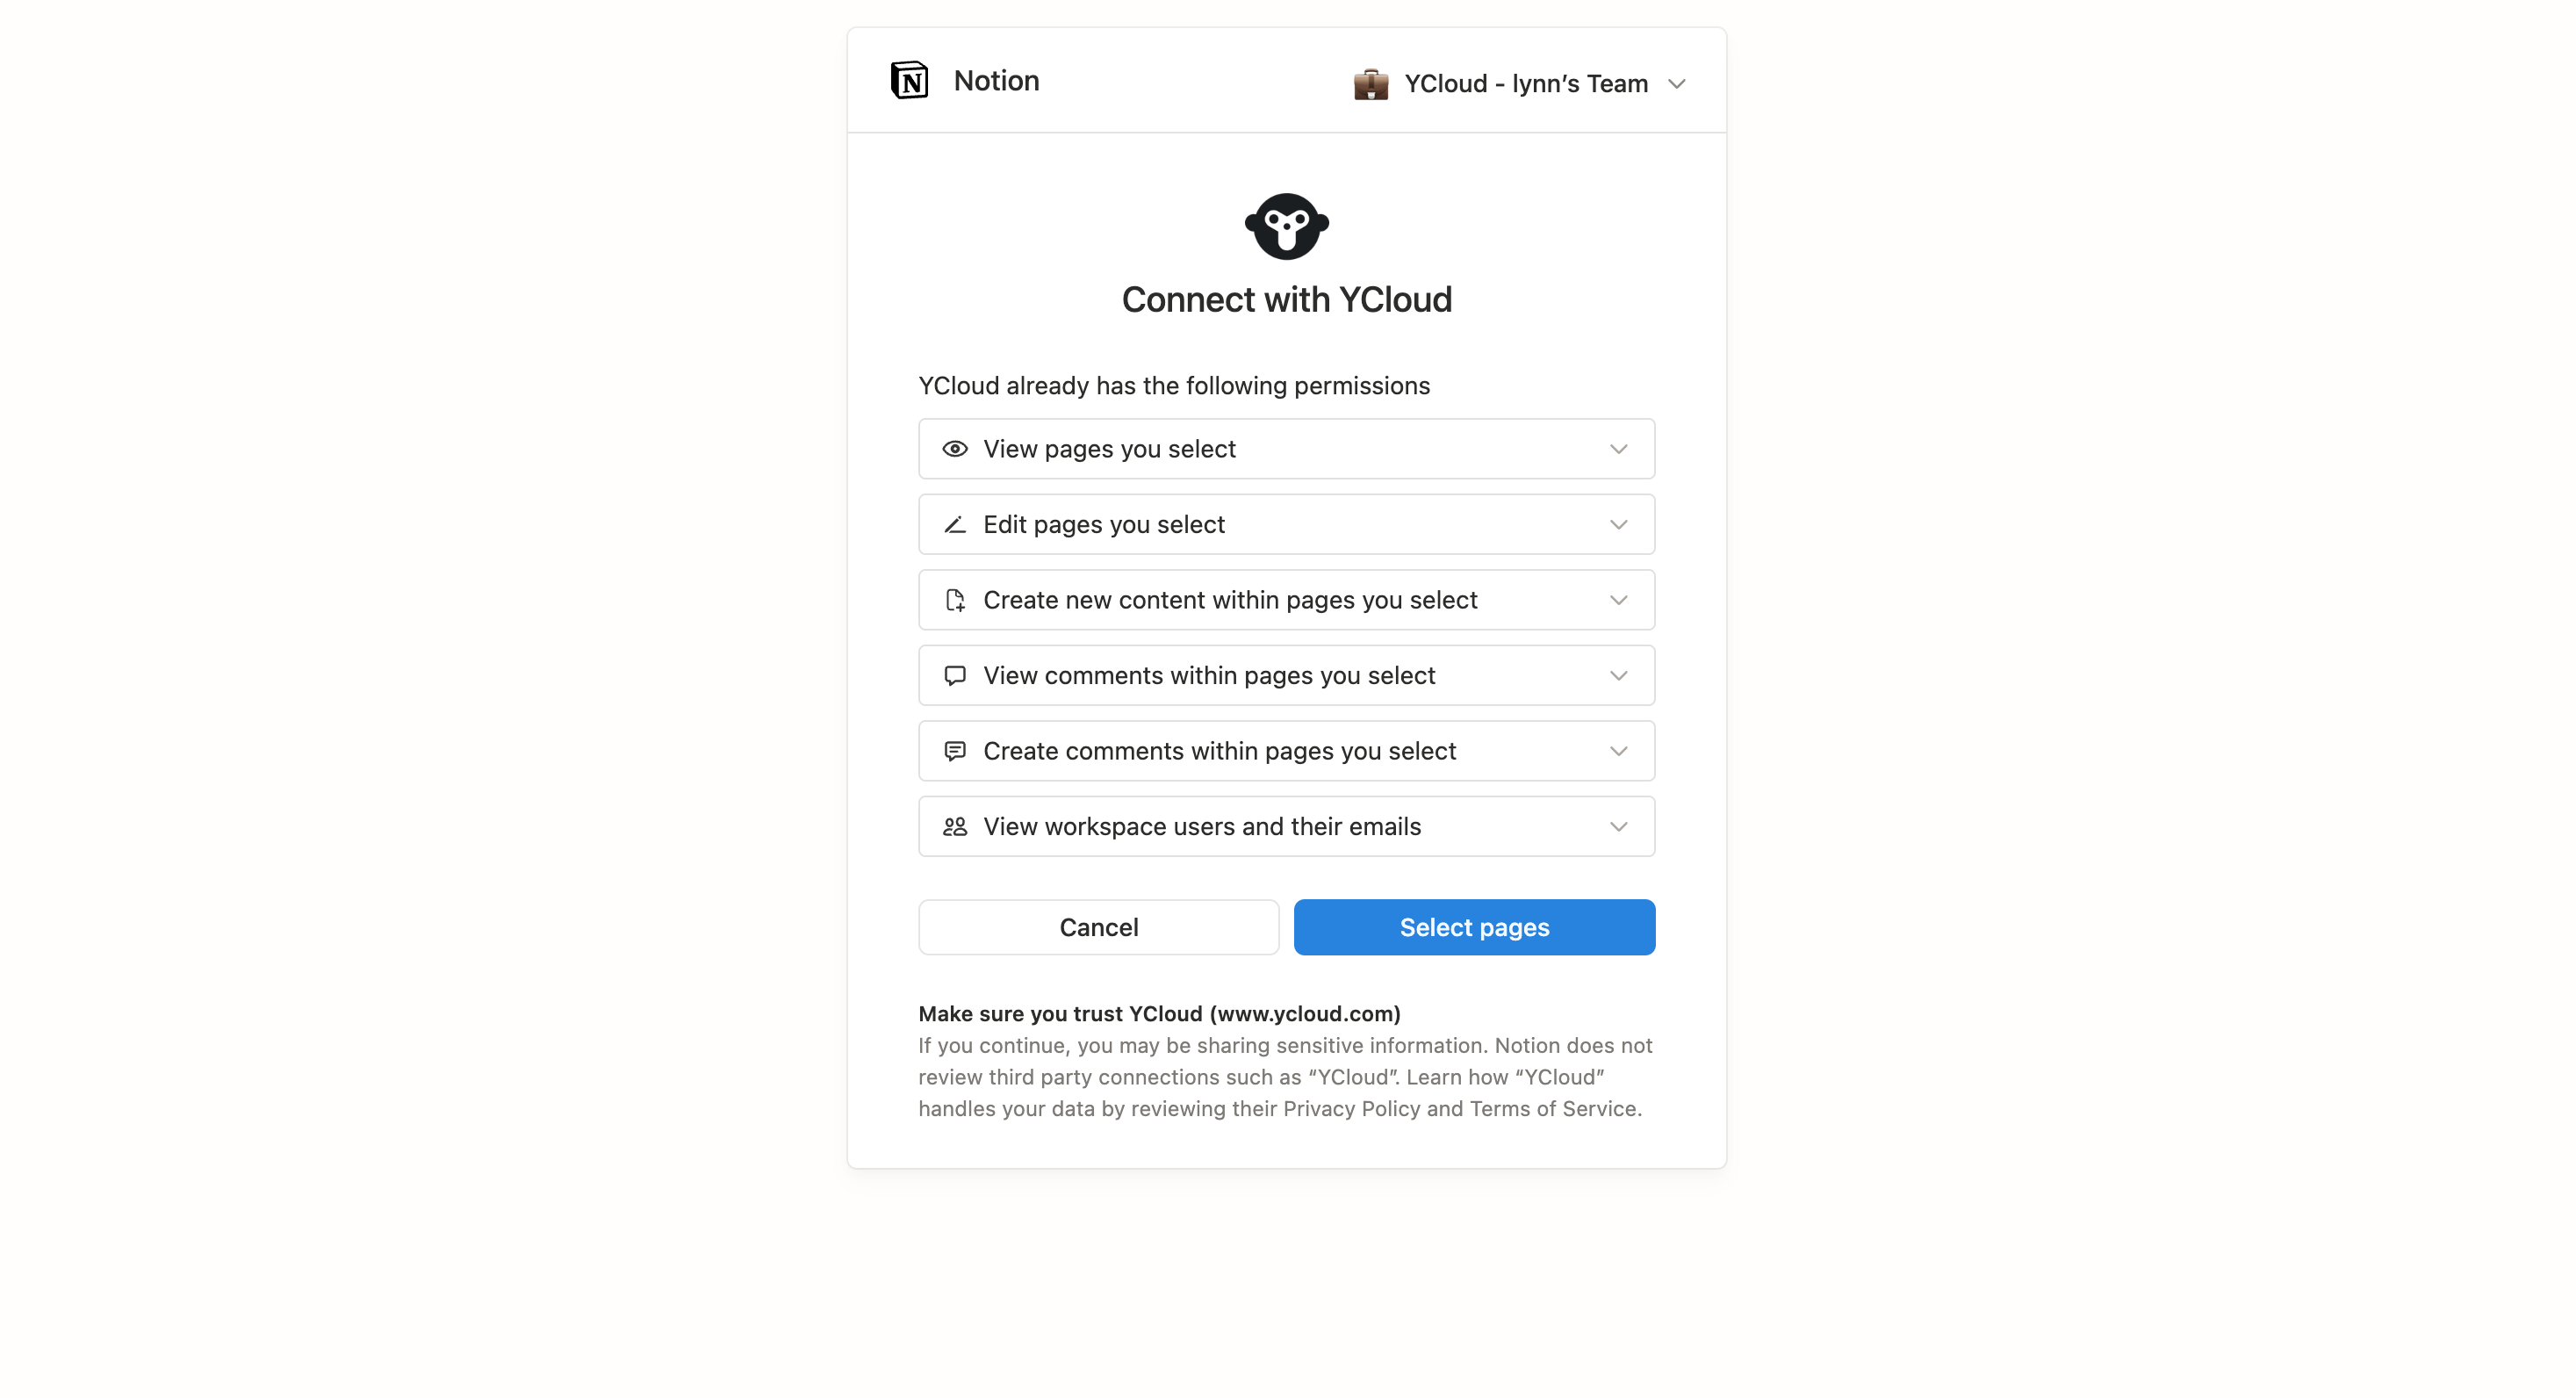
1. 在 YCloud 中选择 **From Notion**。
2. 在 Notion 授权页面确认工作区，并检查 YCloud 请求的权限。
3. 点击 **Select pages**，选择要授权的页面，然后完成授权。

<Frame caption="检查 YCloud 连接权限，并选择要授权的 Notion 页面。">
  <img src="https://mintcdn.com/lchnan/p6uaxB33LOv7N6yH/product-assets/ai-agent-knowledge-2026-10-15/notion-first-authorization.png?fit=max&auto=format&n=p6uaxB33LOv7N6yH&q=85&s=5d23ea5ee8e8bbadce572fb155aaa305" alt="显示请求权限和 Select pages 按钮的 Notion Connect with YCloud 授权页面。" width="2934" height="1592" data-path="product-assets/ai-agent-knowledge-2026-10-15/notion-first-authorization.png" />
</Frame>

### 后续更新授权

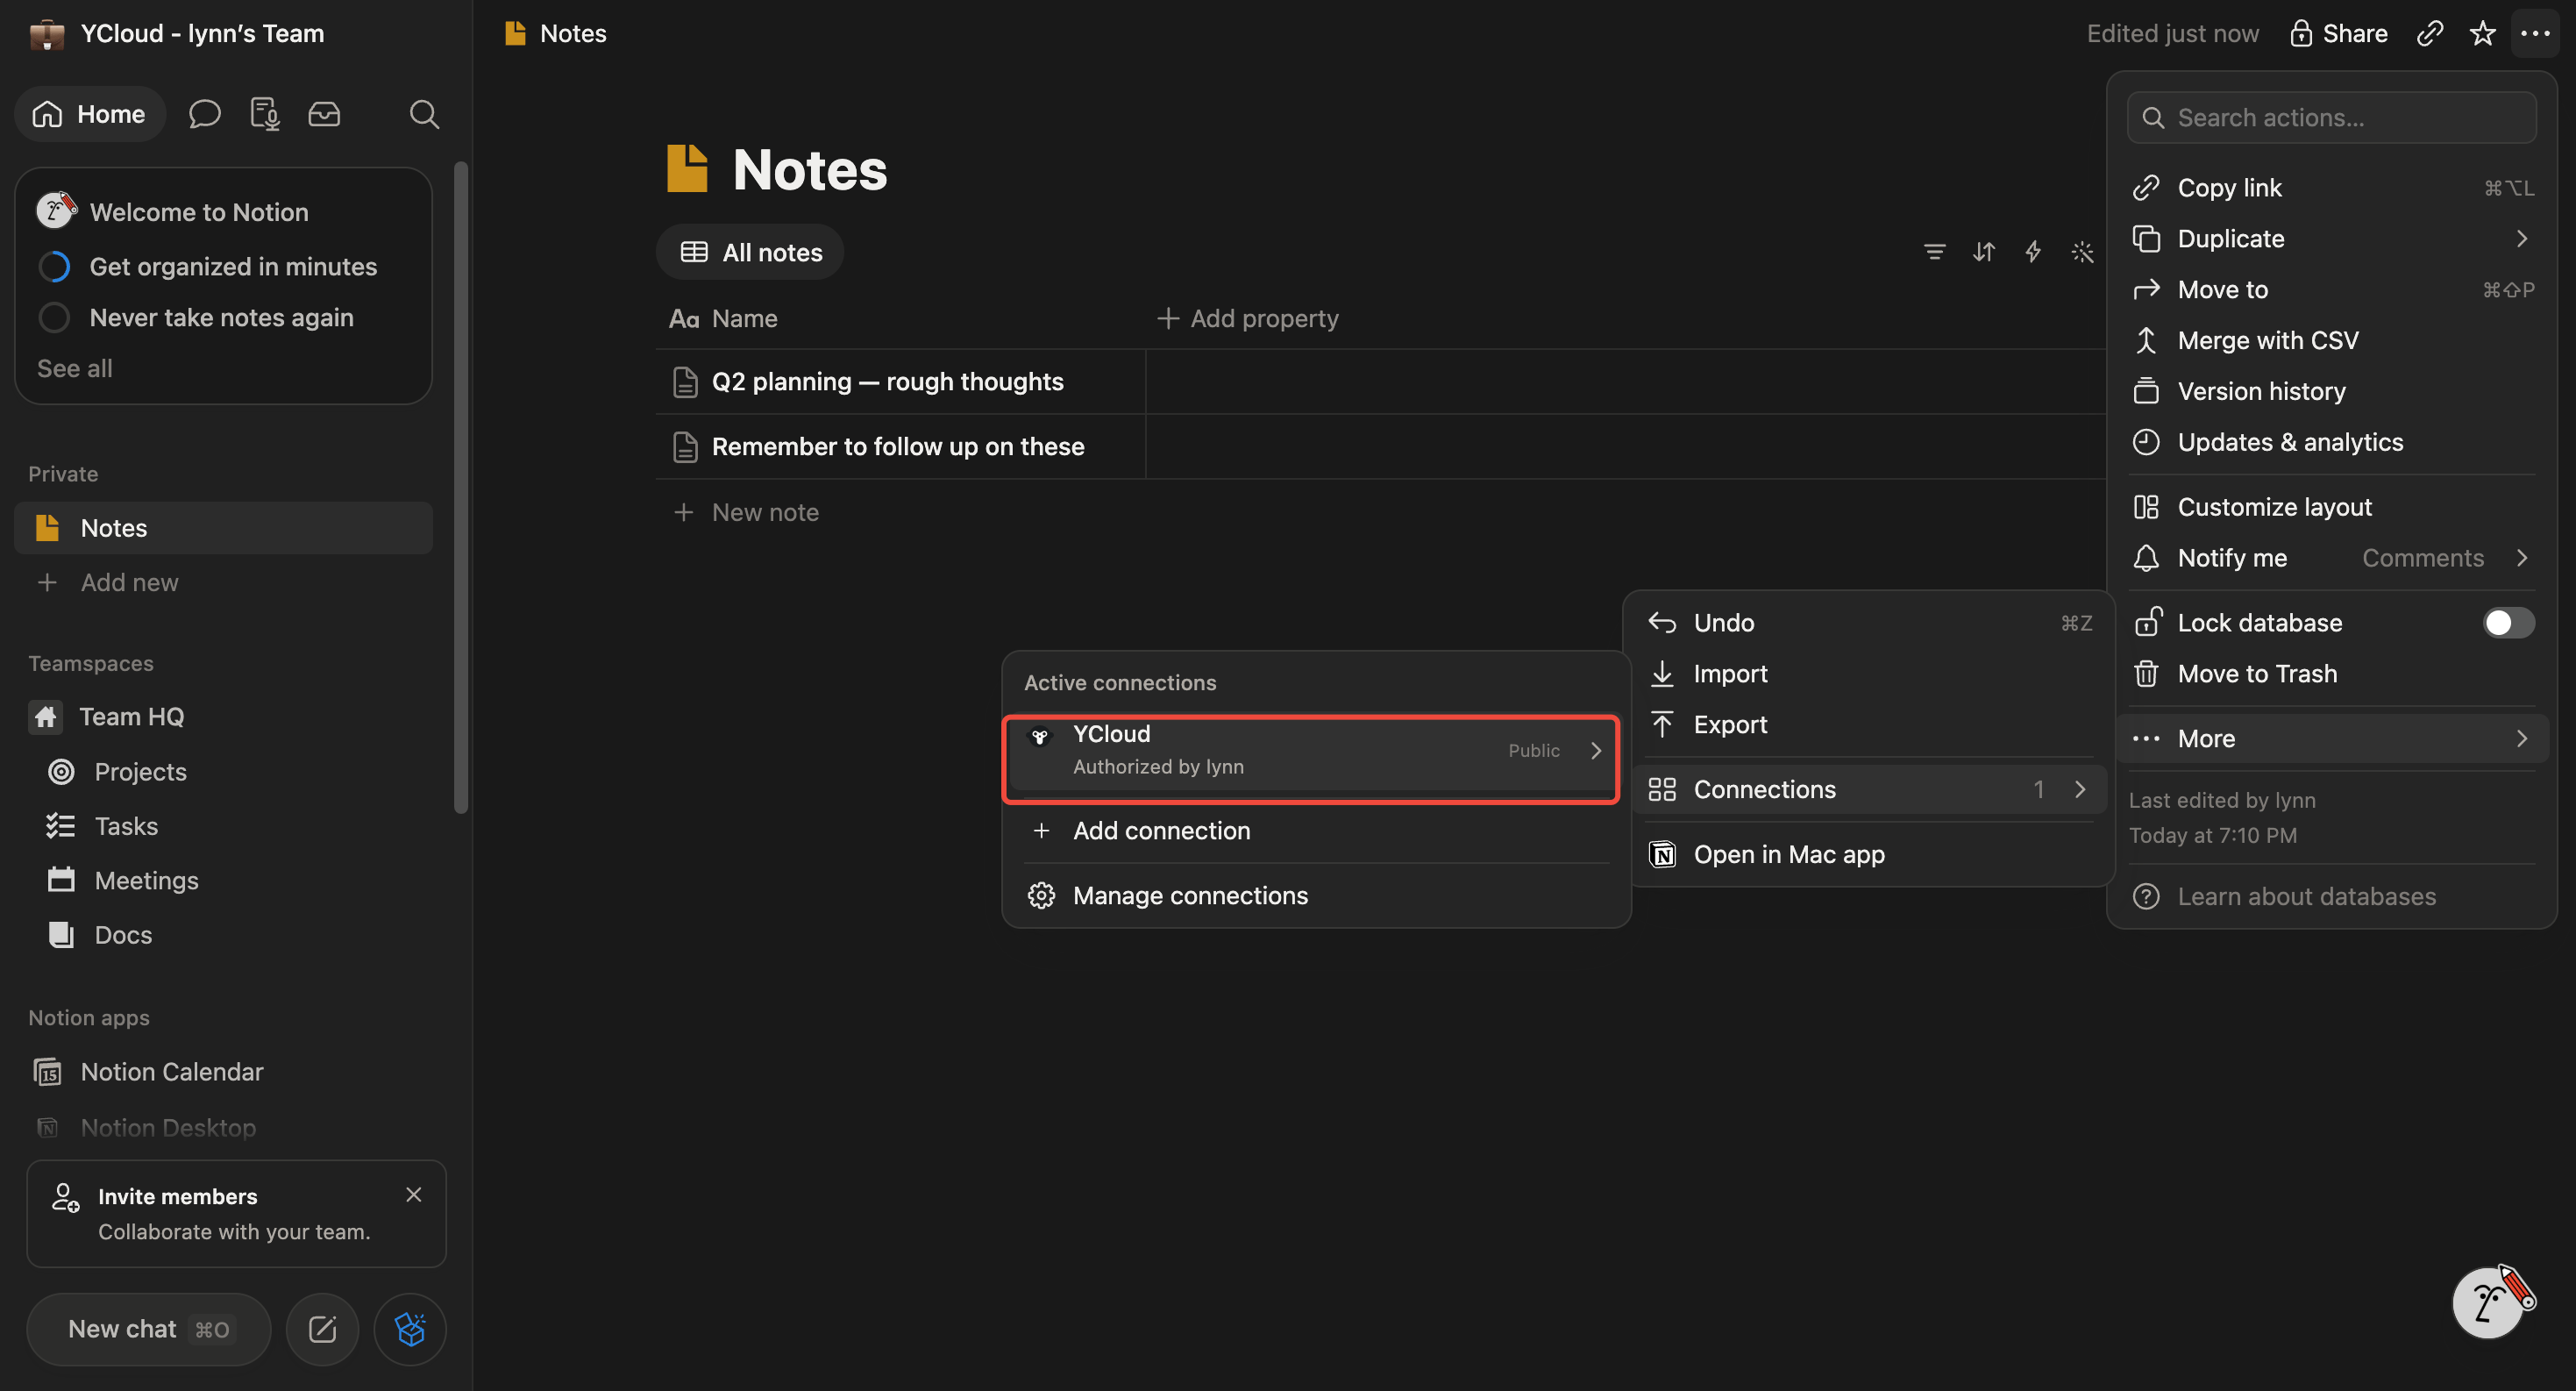
要查看或更改现有 Notion 内容的 YCloud 连接：

1. 打开 Notion 页面或数据库。
2. 点击右上角的三点菜单。
3. 选择 **More** > **Connections** > **YCloud**。
4. 选择 **YCloud**，然后根据需要更新授权。

<Frame caption="依次打开 More、Connections 和 YCloud，更新 Notion 内容的连接。">
  <img src="https://mintcdn.com/lchnan/p6uaxB33LOv7N6yH/product-assets/ai-agent-knowledge-2026-10-15/notion-update-connection.png?fit=max&auto=format&n=p6uaxB33LOv7N6yH&q=85&s=b0441dffc3826bfb811d4fad76f8f935" alt="显示 More、Connections 和 YCloud 路径的 Notion 页面菜单。" width="2938" height="1586" data-path="product-assets/ai-agent-knowledge-2026-10-15/notion-update-connection.png" />
</Frame>


This documentation is built and hosted on [Mintlify](https://mintlify.com), a developer documentation platform.