> ## Documentation Index
> Fetch the complete documentation index at: https://docs.ycloud.com/llms.txt
> Use this file to discover all available pages before exploring further.

# 自动将客户添加到退订列表

使用 YCloud 规则型 Agent 确认退订请求并将客户添加到您的退订列表中。

示例：

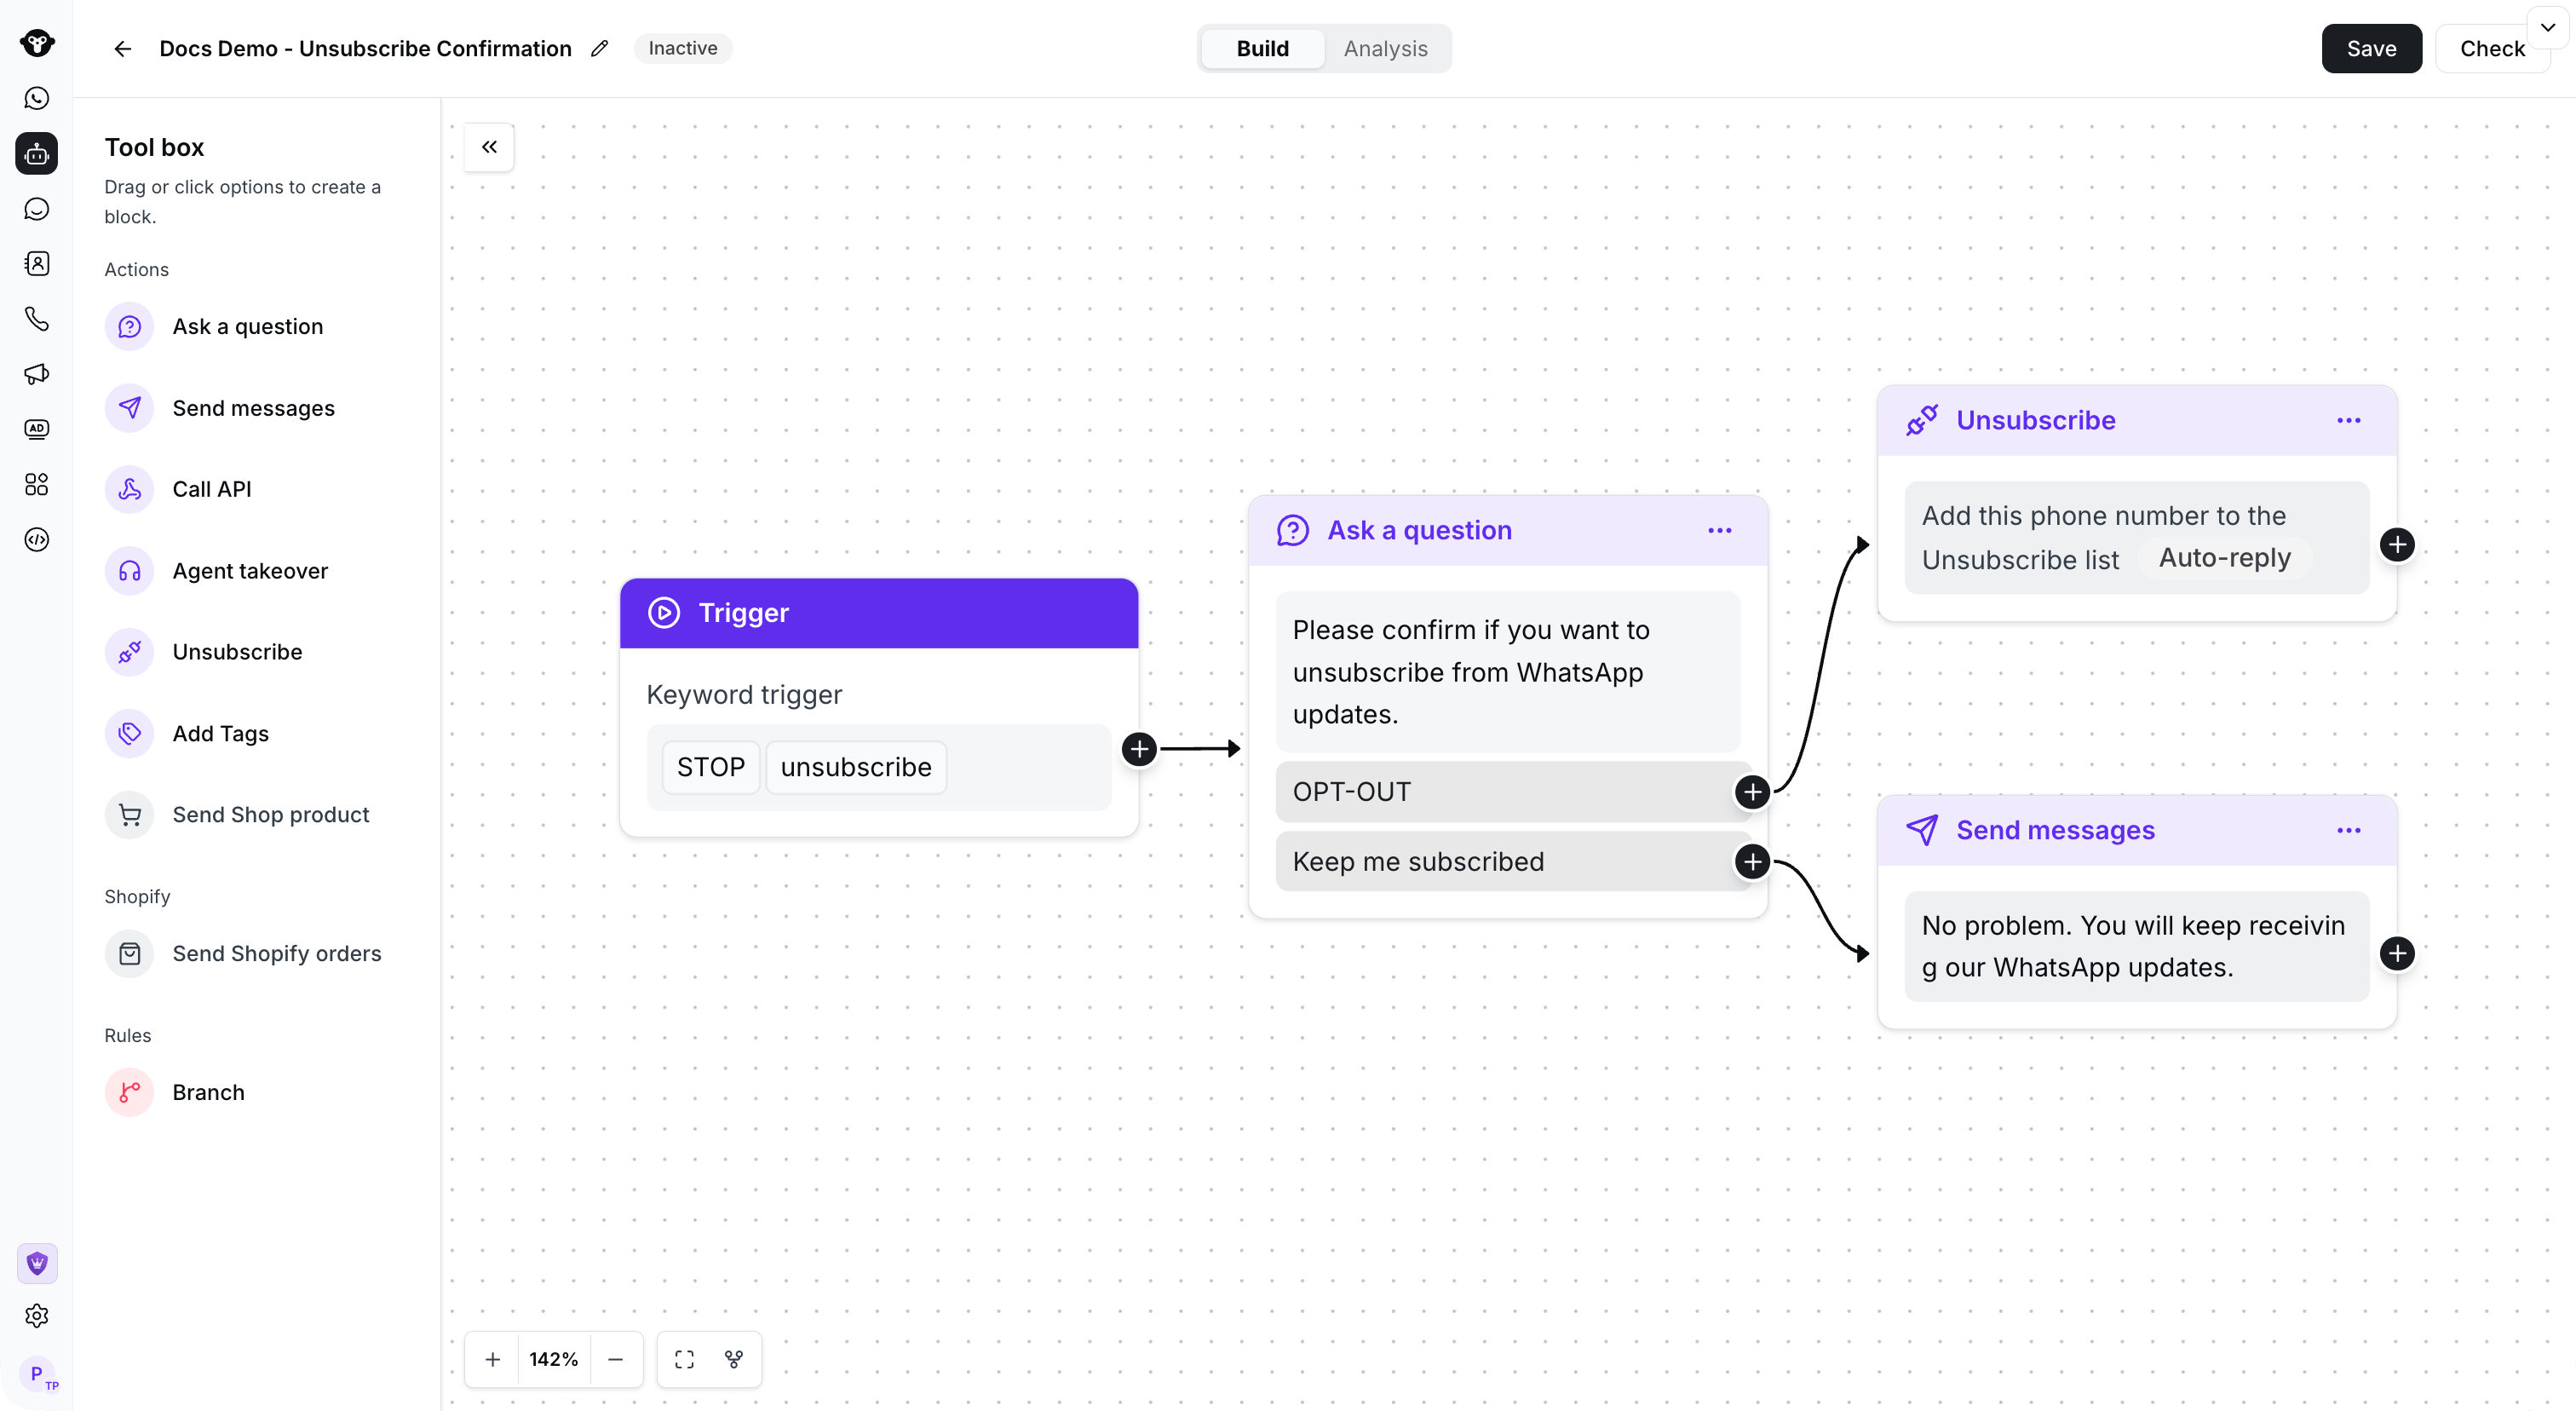
当收到客户的退订消息时，规则型 Agent 会自动询问客户是否确认退订，对于进行二次确认的客户，将其添加到退订列表中。

<Frame caption="A confirmation flow routes OPT-OUT to Unsubscribe and keeps the other branch subscribed.">
  <img src="https://mintcdn.com/lchnan/TsMGu8UTNQaUw-Rc/product-assets/english-help-demo-2026-09-23/rule-complete-flow.png?fit=max&auto=format&n=TsMGu8UTNQaUw-Rc&q=85&s=4aead9ee880f3063f987b3194d005835" alt="关键词触发器连接到确认按钮、退订和发送消息。" width="3024" height="1656" data-path="product-assets/english-help-demo-2026-09-23/rule-complete-flow.png" />
</Frame>

## 步骤 1：创建规则型 Agent 流程

<Frame caption="Open Flows and select Create a flow.">
  <img src="https://mintcdn.com/lchnan/TsMGu8UTNQaUw-Rc/product-assets/english-help-demo-2026-09-23/rule-demo-flow-list-annotated.svg?fit=max&auto=format&n=TsMGu8UTNQaUw-Rc&q=85&s=972fcc6559b08de5043e5d0f2f812fe5" alt="带有“创建流程”和未激活演示流程的规则型 Agent 流程列表。" width="3024" height="1656" data-path="product-assets/english-help-demo-2026-09-23/rule-demo-flow-list-annotated.svg" />
</Frame>

## 步骤 2：添加退订触发关键词

<Info>
  建议：设置多个退订关键词，并选择“包含”（Containing）而非“完全匹配”（Exact matching）。这样，列表中的任意关键词都会触发该规则型 Agent。设置完成后，点击保存按钮。
</Info>

<Frame caption="Choose Containing and add the keywords customers use to opt out.">
  <img src="https://mintcdn.com/lchnan/TsMGu8UTNQaUw-Rc/product-assets/english-help-demo-2026-09-23/rule-keywords-annotated.svg?fit=max&auto=format&n=TsMGu8UTNQaUw-Rc&q=85&s=7fbd06fc0506384980d18aee19a3288f" alt="包含 STOP 和 unsubscribe 的包含关键词规则。" width="3024" height="1656" data-path="product-assets/english-help-demo-2026-09-23/rule-keywords-annotated.svg" />
</Frame>

## 步骤 3：确认客户的退订意向（可选）

<Warning>
  强烈建议添加此步骤，以避免客户误入退订列表。您可以选择使用“提问”（Ask a question）组件来询问客户：“请确认您是否要退订消息？”
</Warning>

详细步骤：

1. 选择“提问”（Ask a question）组件

2. 选择按钮（Buttons）消息格式

<Frame caption="Choose Buttons for a confirmation question.">
  <img src="https://mintcdn.com/lchnan/TsMGu8UTNQaUw-Rc/product-assets/english-help-demo-2026-09-23/rule-question-format-annotated.svg?fit=max&auto=format&n=TsMGu8UTNQaUw-Rc&q=85&s=7932eaffc1620487c51611ecca1f8135" alt="带有按钮选项的提问消息格式菜单。" width="3024" height="1656" data-path="product-assets/english-help-demo-2026-09-23/rule-question-format-annotated.svg" />
</Frame>

3. 设置询问内容：“请确认您是否要退订 WhatsApp 消息？”

* 为按钮设置两个选项
  * 退订（OPT-OUT）
  * 保持订阅（Keep me subscribed）
* 设置完成后，点击保存

<Frame caption="Enter the confirmation question and both reply choices, then save the node.">
  <img src="https://mintcdn.com/lchnan/TsMGu8UTNQaUw-Rc/product-assets/english-help-demo-2026-09-23/rule-confirm-question-annotated.svg?fit=max&auto=format&n=TsMGu8UTNQaUw-Rc&q=85&s=43ca5d026129ba7463fd57425ca0f98c" alt="带有 OPT-OUT 和 Keep me subscribed 按钮的确认问题。" width="3024" height="1656" data-path="product-assets/english-help-demo-2026-09-23/rule-confirm-question-annotated.svg" />
</Frame>

4. 设置完成后，将关键词触发器连接到“提问”组件

## 步骤 4：添加到退订列表

1. 添加“退订”（Unsubscribe）组件

2. 您可以选择是否自动回复退订成功的消息。如果需要，请点击 **自动回复** 开关，并在下方输入自动回复内容，然后选择保存。

<Frame caption="Enable Auto-reply if you want to confirm the successful unsubscribe action.">
  <img src="https://mintcdn.com/lchnan/TsMGu8UTNQaUw-Rc/product-assets/english-help-demo-2026-09-23/rule-unsubscribe-reply-annotated.svg?fit=max&auto=format&n=TsMGu8UTNQaUw-Rc&q=85&s=7d9b9cbbdda43b092f8aff49d4c2073d" alt="已启用自动回复并包含确认消息的退订节点。" width="3024" height="1656" data-path="product-assets/english-help-demo-2026-09-23/rule-unsubscribe-reply-annotated.svg" />
</Frame>

3. 将“提问”组件中的“OPT-OUT”按钮连接到“退订”组件

<Frame caption="Connect the trigger to the question, then connect OPT-OUT to Unsubscribe.">
  <img src="https://mintcdn.com/lchnan/TsMGu8UTNQaUw-Rc/product-assets/english-help-demo-2026-09-23/rule-question-connection-annotated.svg?fit=max&auto=format&n=TsMGu8UTNQaUw-Rc&q=85&s=9424e3af7b00fe05e79356128cc65fcd" alt="从关键词触发器到确认问题以及从 OPT-OUT 到退订的连接" width="3024" height="1656" data-path="product-assets/english-help-demo-2026-09-23/rule-question-connection-annotated.svg" />
</Frame>

## 步骤 5：添加发送文本消息（可选）

添加发送文本消息组件，并将其连接到 **Keep me subscribed** 按钮

<Frame caption="Send a short confirmation on the Keep me subscribed branch.">
  <img src="https://mintcdn.com/lchnan/TsMGu8UTNQaUw-Rc/product-assets/english-help-demo-2026-09-23/rule-cancel-reply-annotated.svg?fit=max&auto=format&n=TsMGu8UTNQaUw-Rc&q=85&s=9c7c5277200273ffebb6ec59fd1b4822" alt="包含继续订阅确认的发送文本消息编辑器。" width="3024" height="1656" data-path="product-assets/english-help-demo-2026-09-23/rule-cancel-reply-annotated.svg" />
</Frame>

## 步骤 6：保存并激活规则型 Agent

编辑流程后，选择 **保存**，选择 **激活**，然后再次保存。当客户完成退订流程时，YCloud 会将该电话号码添加到 **联系人 > 退订列表** 中。

<Frame caption="Choose the desired status before the final Save. This screenshot shows the activation option.">
  <img src="https://mintcdn.com/lchnan/TsMGu8UTNQaUw-Rc/product-assets/english-help-demo-2026-09-23/rule-save-status-annotated.svg?fit=max&auto=format&n=TsMGu8UTNQaUw-Rc&q=85&s=31f947db4de3e54cf8b566295b525690" alt="已选择激活状态并带有保存按钮的保存流程对话框。" width="3024" height="1656" data-path="product-assets/english-help-demo-2026-09-23/rule-save-status-annotated.svg" />
</Frame>


This documentation is built and hosted on [Mintlify](https://mintlify.com), a developer documentation platform.